Seatmap Inspector
Seatmap InspectorGeneral
In the event settings, you will find the Seatmap Inspector, a tool that allows various changes and adjustments to be made to the seating plan of an event. Below are some of the main functions and their procedures explained in detail.
Main Functions of the Seatmap Inspector:
Changing Seat Status
Creating Contingents
Changing Price Categories
Viewing Seat History Information
Viewing Ticket Information
Seatmap InspectorBlocking Seats
There are three methods to block seats in a seatmap. The appropriate method depends on the specific use case.
Short-Term: Blocking Seats
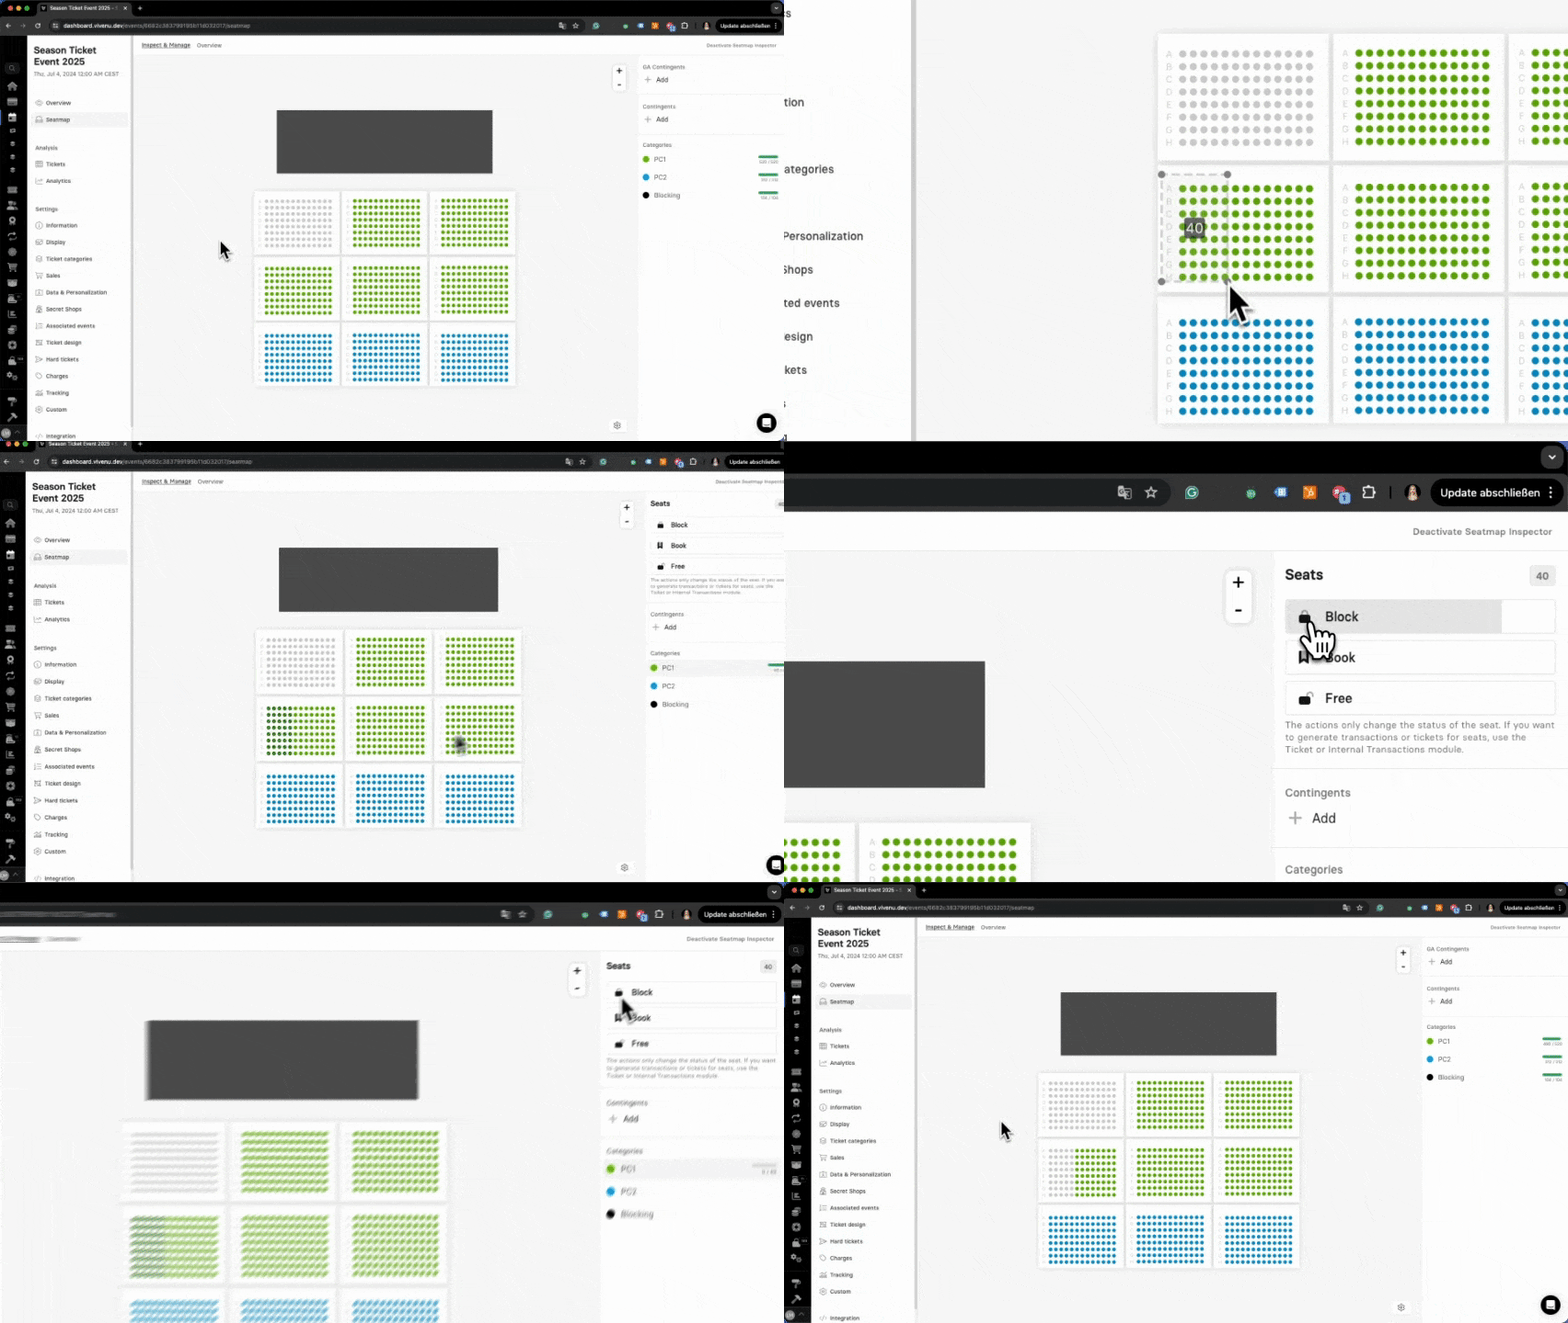
The quick blocking via the Seatmap Inspector is used to swiftly block seats that are no longer intended for booking, without much effort. This blocking applies only to a specific event and not to the entire seatmap. When duplicating an event, these blocks are not carried over.
Use Cases
Seats reserved for an event for employees where no tickets are required.
Restricted view for an event where seats are not to be sold.
And more
Characteristics
Seats can be blocked and released quickly with just a few clicks.
Blocking is effective only for a specific event.
Tickets for these seats cannot be booked under any circumstances unless they are released again. This applies to internal bookings as well.
No additional information, justifications, or notices are added to the blocked seats.
How To
Open the event settings of the event where seats are to be blocked using the Events module.
Navigate to the Seatmap tab within the event settings.
Click on the desired seat(s) to block. Hold down the Shift key to select multiple seats simultaneously. Use the Ctrl or Control key to draw a polygon for selection.
Click on Block in the menu on the right. Hold the key until the seats are blocked. They will now appear with the status NOTFORSALE.
Behavior for Season Events
Once seats are blocked, they are no longer available for the associated events. This is similar to the behavior of a seat that has already been booked.If a seat is blocked in the Season Event, it is not bookable for any sub-events. Similarly, if a seat is blocked in a sub-event, it is also unavailable in the Season Event.
Long-Term: Seatmap Categorization
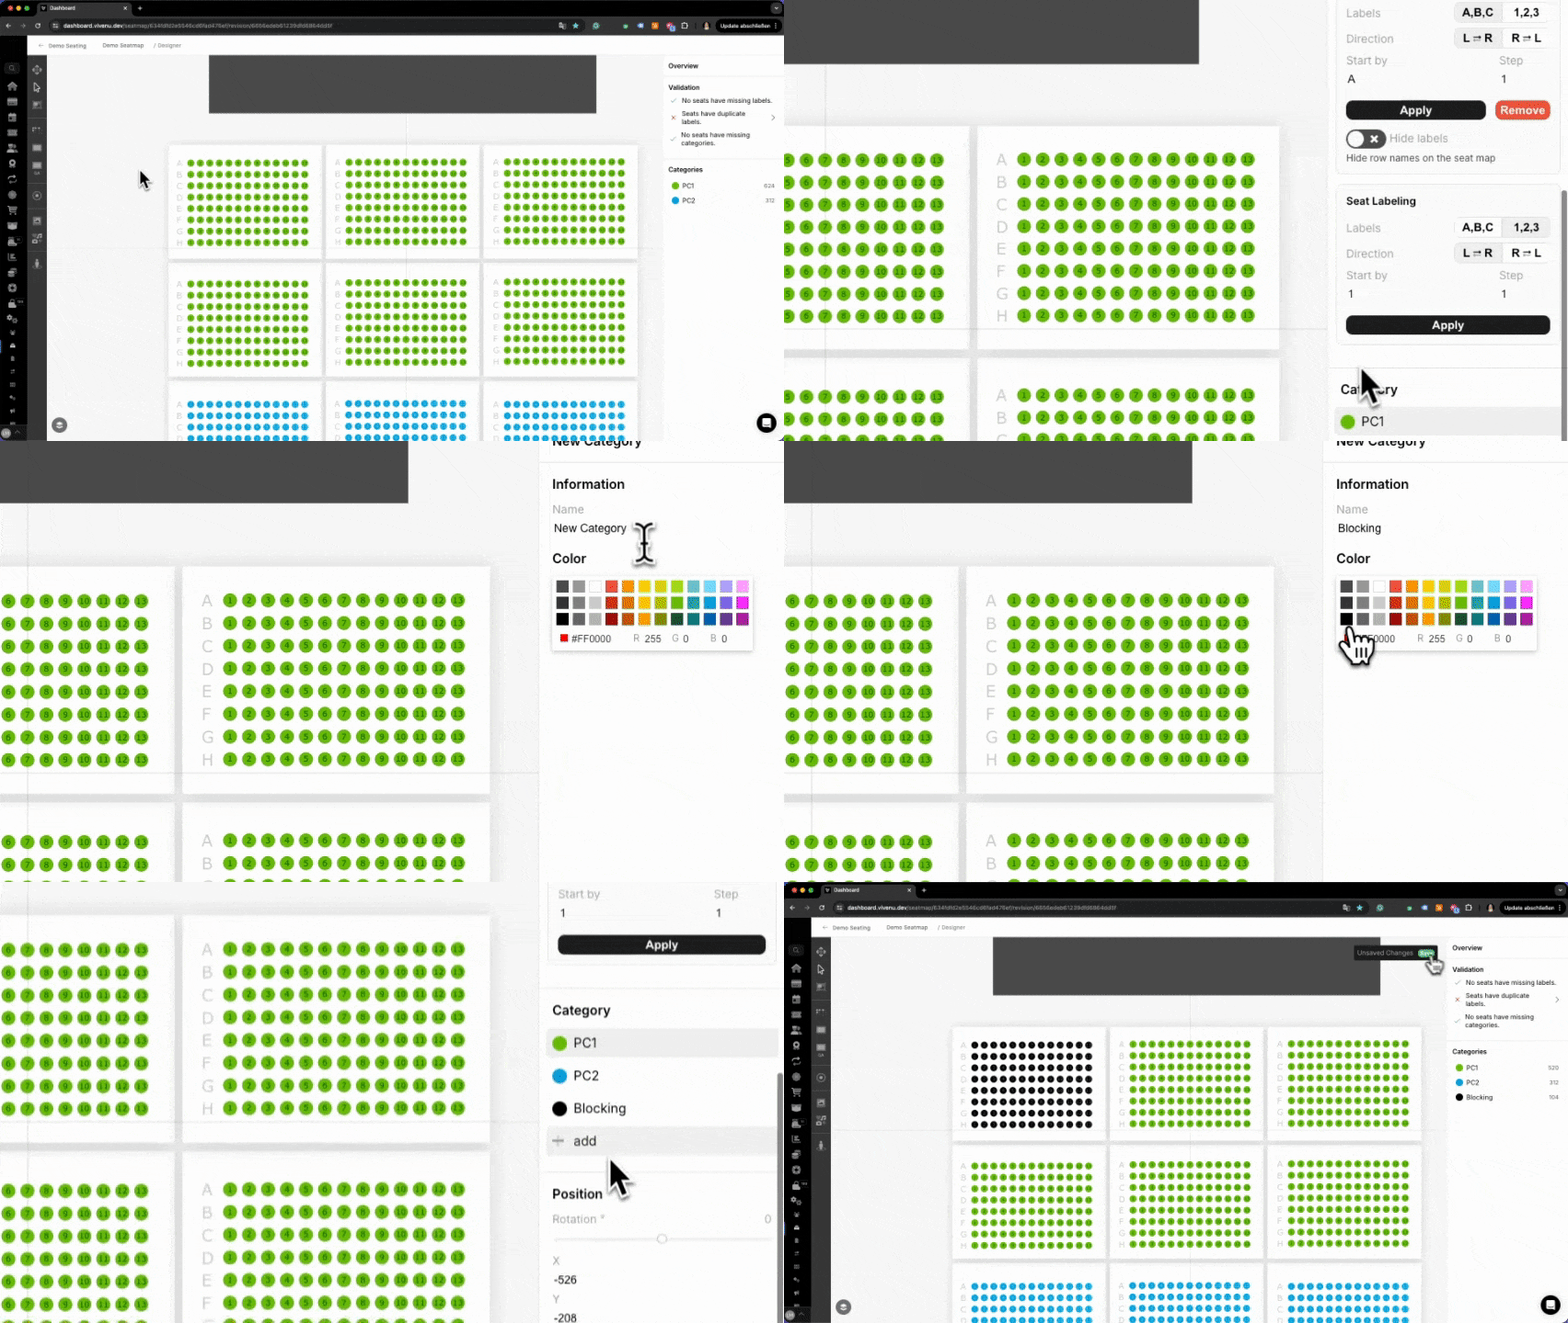
If seats are not only intended to be temporarily blocked for a specific event but rather permanently in the seatmap, using seat categories is the recommended approach. Seats are not actually "blocked" but rather assigned to a seat category that is not associated with any ticket category, hence making them non-bookable.
Use Cases
Certain seats should always be reserved for press purposes and tickets are needed only in exceptional cases.
There are seats that should never be available for sale but should still be displayed on the seatmap.
Seats are intended for specific events without requiring a new seatmap creation.
And more
Characteristics:
Seats are categorized for blocking purposes directly in the seatmap designer.
Initially, categorization applies to every event associated with the seatmap.
The category can be reassigned if needed for specific events to enable sales.
Seats can be clearly labeled internally and externally to ensure transparency.
How To
Navigate to the Settings module in the sidebar and select the Seatmap module.
Choose the desired seatmap and access its settings.
Select the seats using the Selection Tool or Seat Selection Tool.
Add a new category from the menu and name it accordingly (e.g., "Blocked", "Press", etc.). This name will be visible to customers in the shop as well.
Assign this category to the selected seats.
These seats will now not be assigned to any ticket category in the event, thereby making them non-bookable. If they need to be available for booking, a ticket category can be created and linked to the seat category at any time.
Note: This method does not physically "block" seats but utilizes the flexibility of seat categorization to effectively release or restrict seats as needed.
Flexible: Seat Contingents
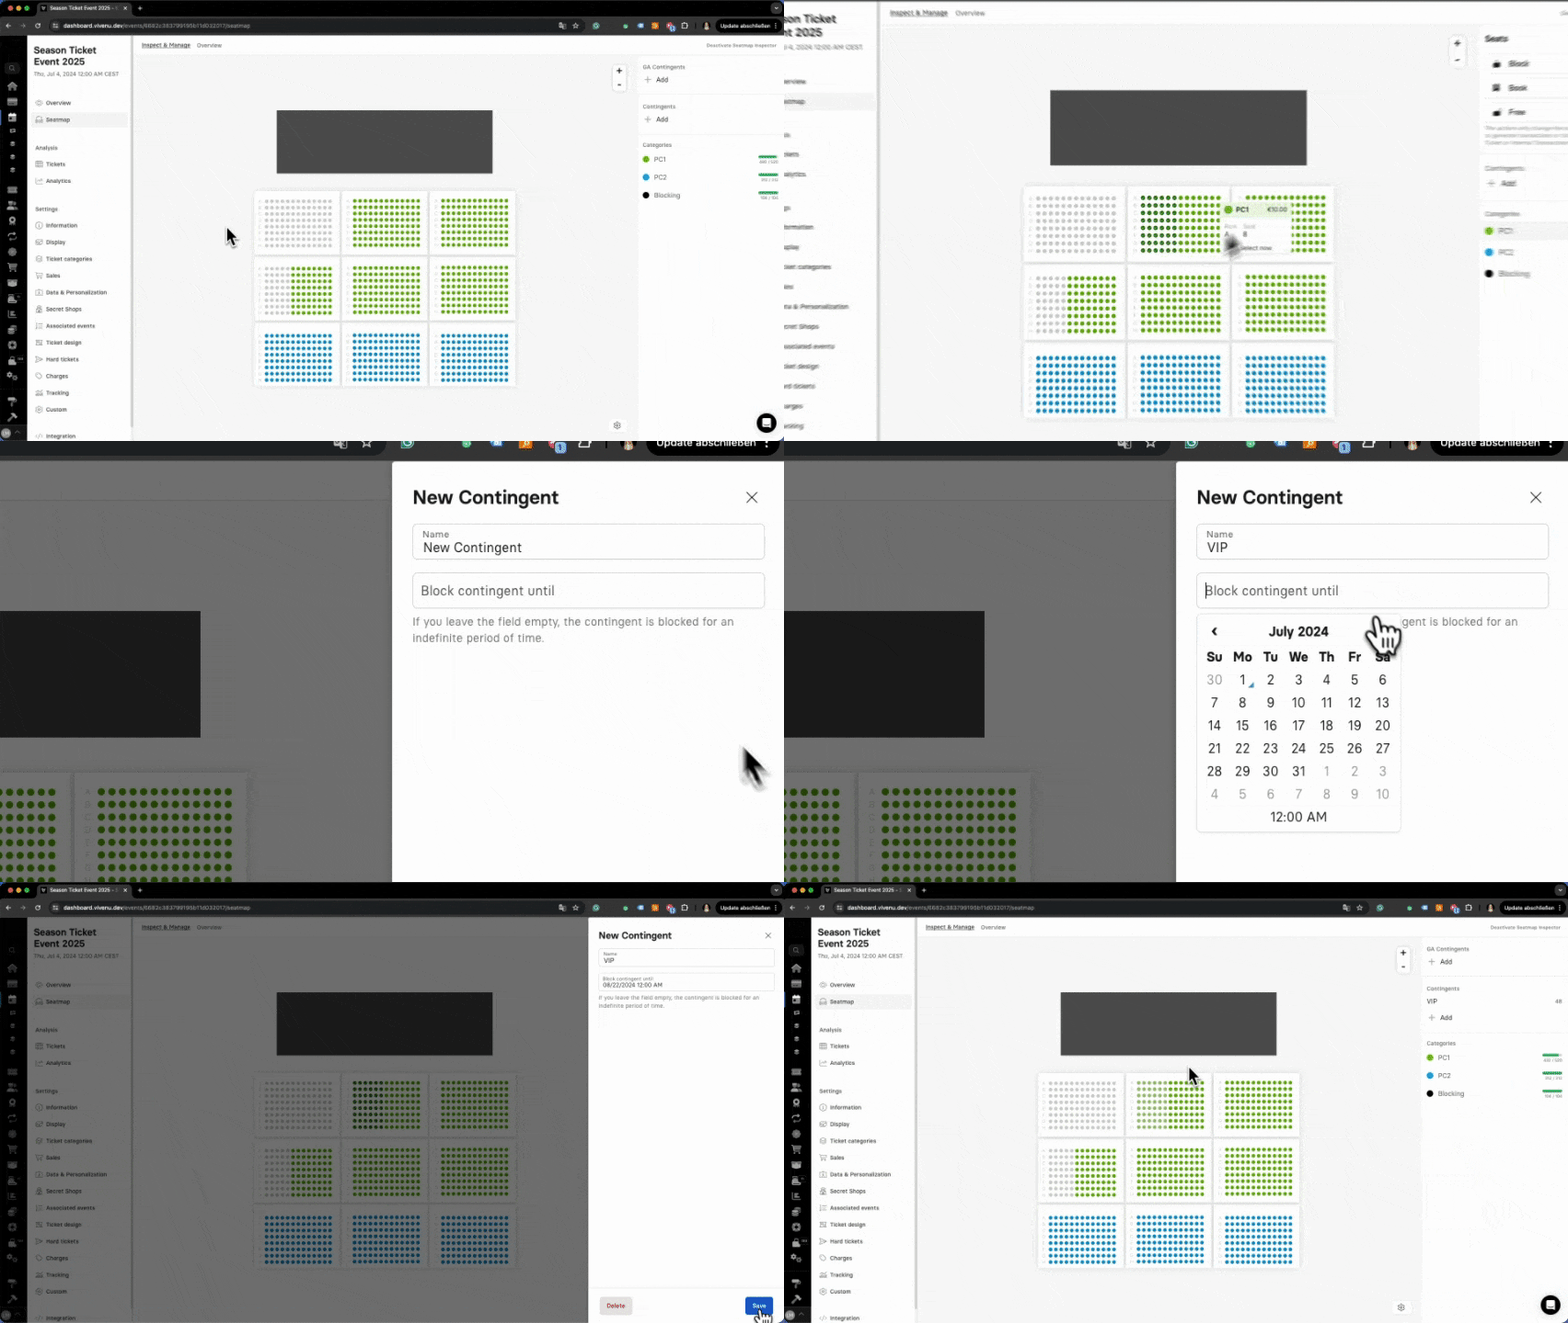
When flexibility is key in seat blocking—for example, to accommodate ticket bookings as needed or to block seats both event-specifically and independently—seat contingents are highly suitable. Further functionalities and details about seat contingents can be found in a separate article.
Use Cases
Seats need to be quickly blocked for sponsors, with the option to issue tickets internally later.
Seats are to be reserved and then released for purchase.
Seats should be blocked until a specific deadline and restricted to a particular customer group.
And more
Characteristics
Seats are assigned to various contingents per event, which can be inherited during duplication.
A date can be set until which seats remain blocked by the allotment.
Allotted seats can be sold for specific tickets via secret shops.
Internal designations can be added through the name of the allotment.
How To
Navigate to the event settings via the Events module where seats are to be blocked.
Go to the Seatmap tab within the event settings.
Click on the desired seat(s) to block. Hold down the Shift key to select multiple seats simultaneously. Use the Ctrl or Control key to draw a polygon for selection.
Click on the desired allotment in the menu on the right or click Add to create a new allotment.
Assign a name to the allotment and, if necessary, set a date until which the allotment should remain active.
By adding the allotment, these seats are now blocked for the regular online shop. However, the allotment can be released for sale via secret shops or reverted to the regular online shop as needed.
Behavior for Season Events:
If seats are assigned to an allotment, this remains effective for associated events, rendering the seats non-bookable. If a seat is allotted in the Season Event, it is unavailable for all sub-events. Similarly, if a seat is allotted in a sub-event, it is also unavailable in the Season Event.
Seatmap InspectorSeat Contingents
Seat contingents, also known as allotments, provide a flexible way to reserve or block seats for specific purposes or groups. These reservations can be adjusted and expanded as needed. An allotment represents a special category that can be assigned to a seat per event. Subsequently, contingents can be resold via secret shops, allowing certain seats to be available exclusively to specific customer groups or for internal sales only.
1 Create Contingents

Navigate to the Event Settings via the Events module.
Go to the Seatmap tab within the Event Settings.
Click on the desired seat(s) to be allotted. Hold down the Shift key to select multiple seats simultaneously. Use the Ctrl or Control key to draw a polygon for selection.
Click on the desired allotment in the menu on the right or click Add to create a new allotment.
Assign a name to the allotment and, if necessary, set a date until which the allotment should remain active.
2 Sell Contingents
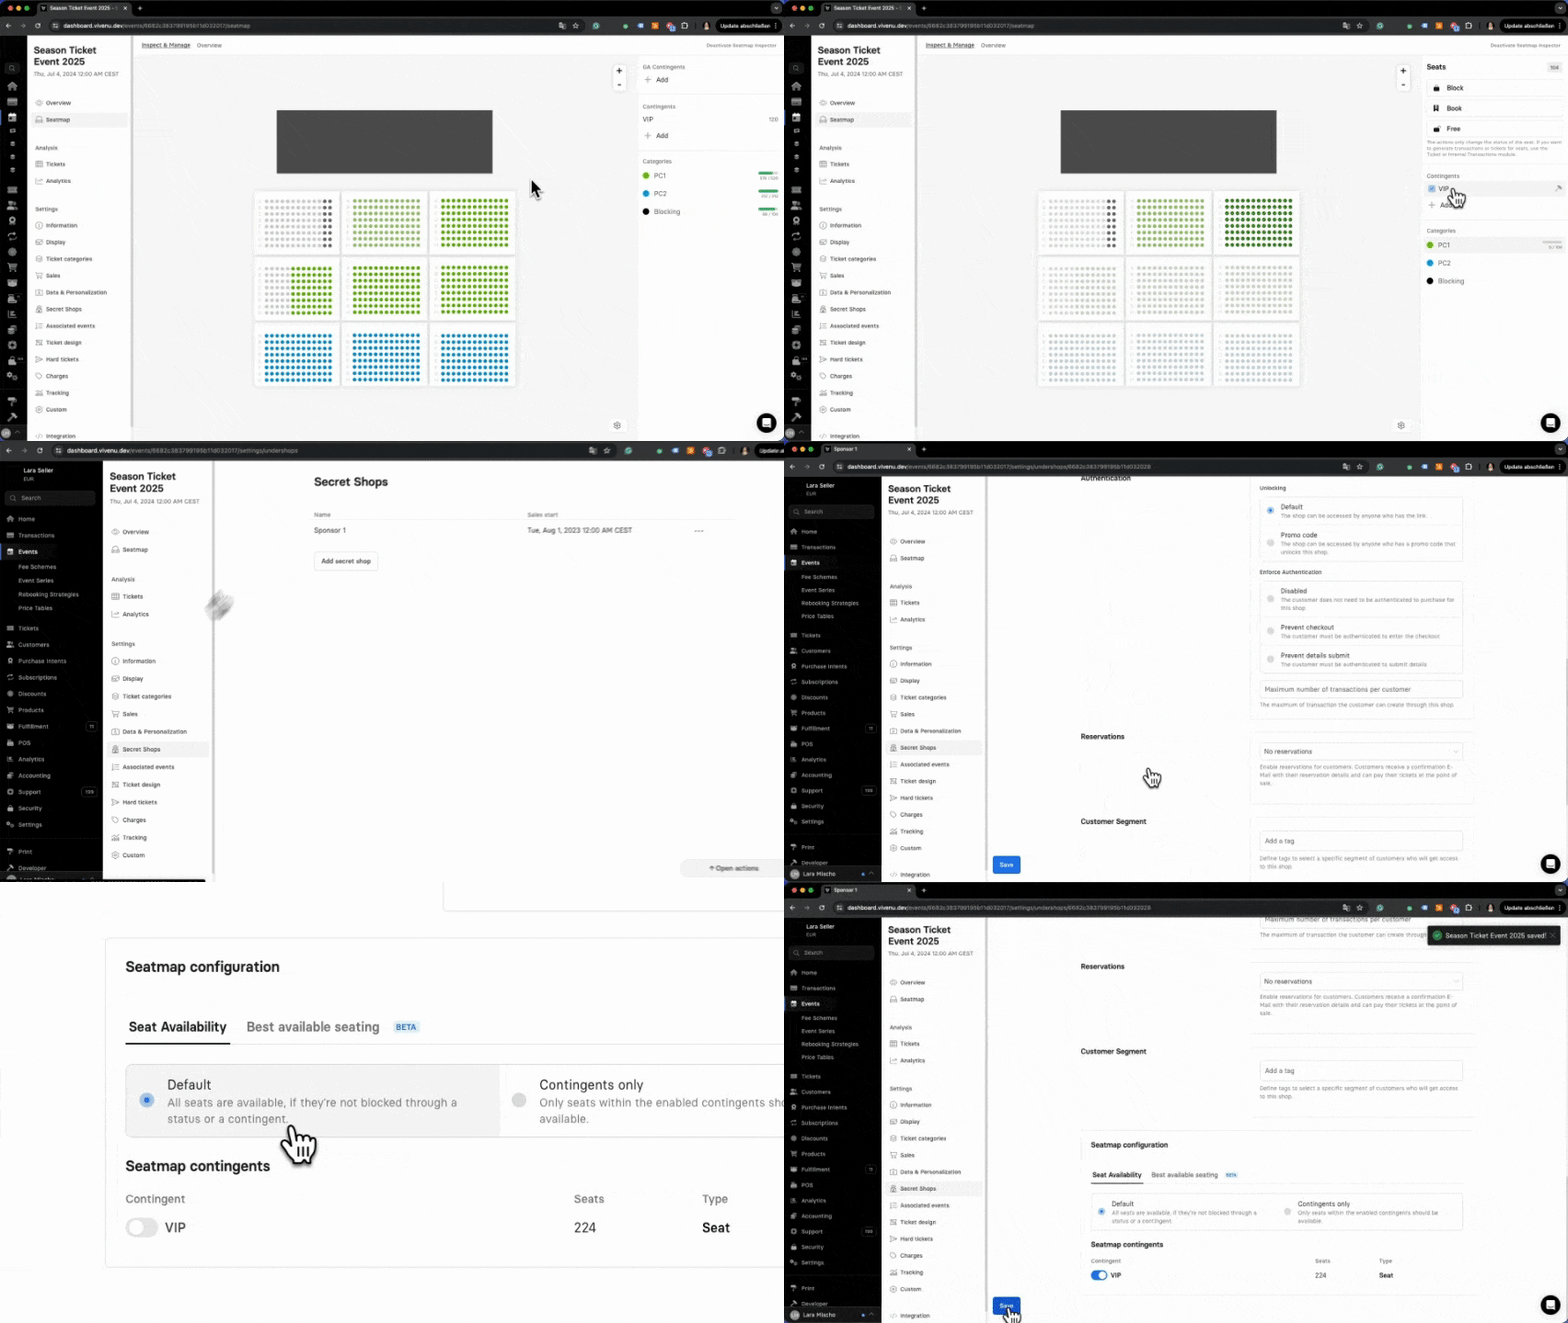
After linking an contingents with a seat, it is initially blocked and unavailable for purchase in the online shop. Now, these contingents can be resold, for example, via secret shops:
Open the Event Settings of the desired event via the Events module.
Go to the Event Settings and select the Secret Shops tab.
Scroll down to the Seatmap Configuration section.
Choose whether to sell only selected seat contingents or the default option - all seats including the selected contingents.
Activate the contingents that should be available in the secret shop.
Click on Save.
For further details on settings within the Secret Shop, refer to a separate article.
3 Delete Contingents
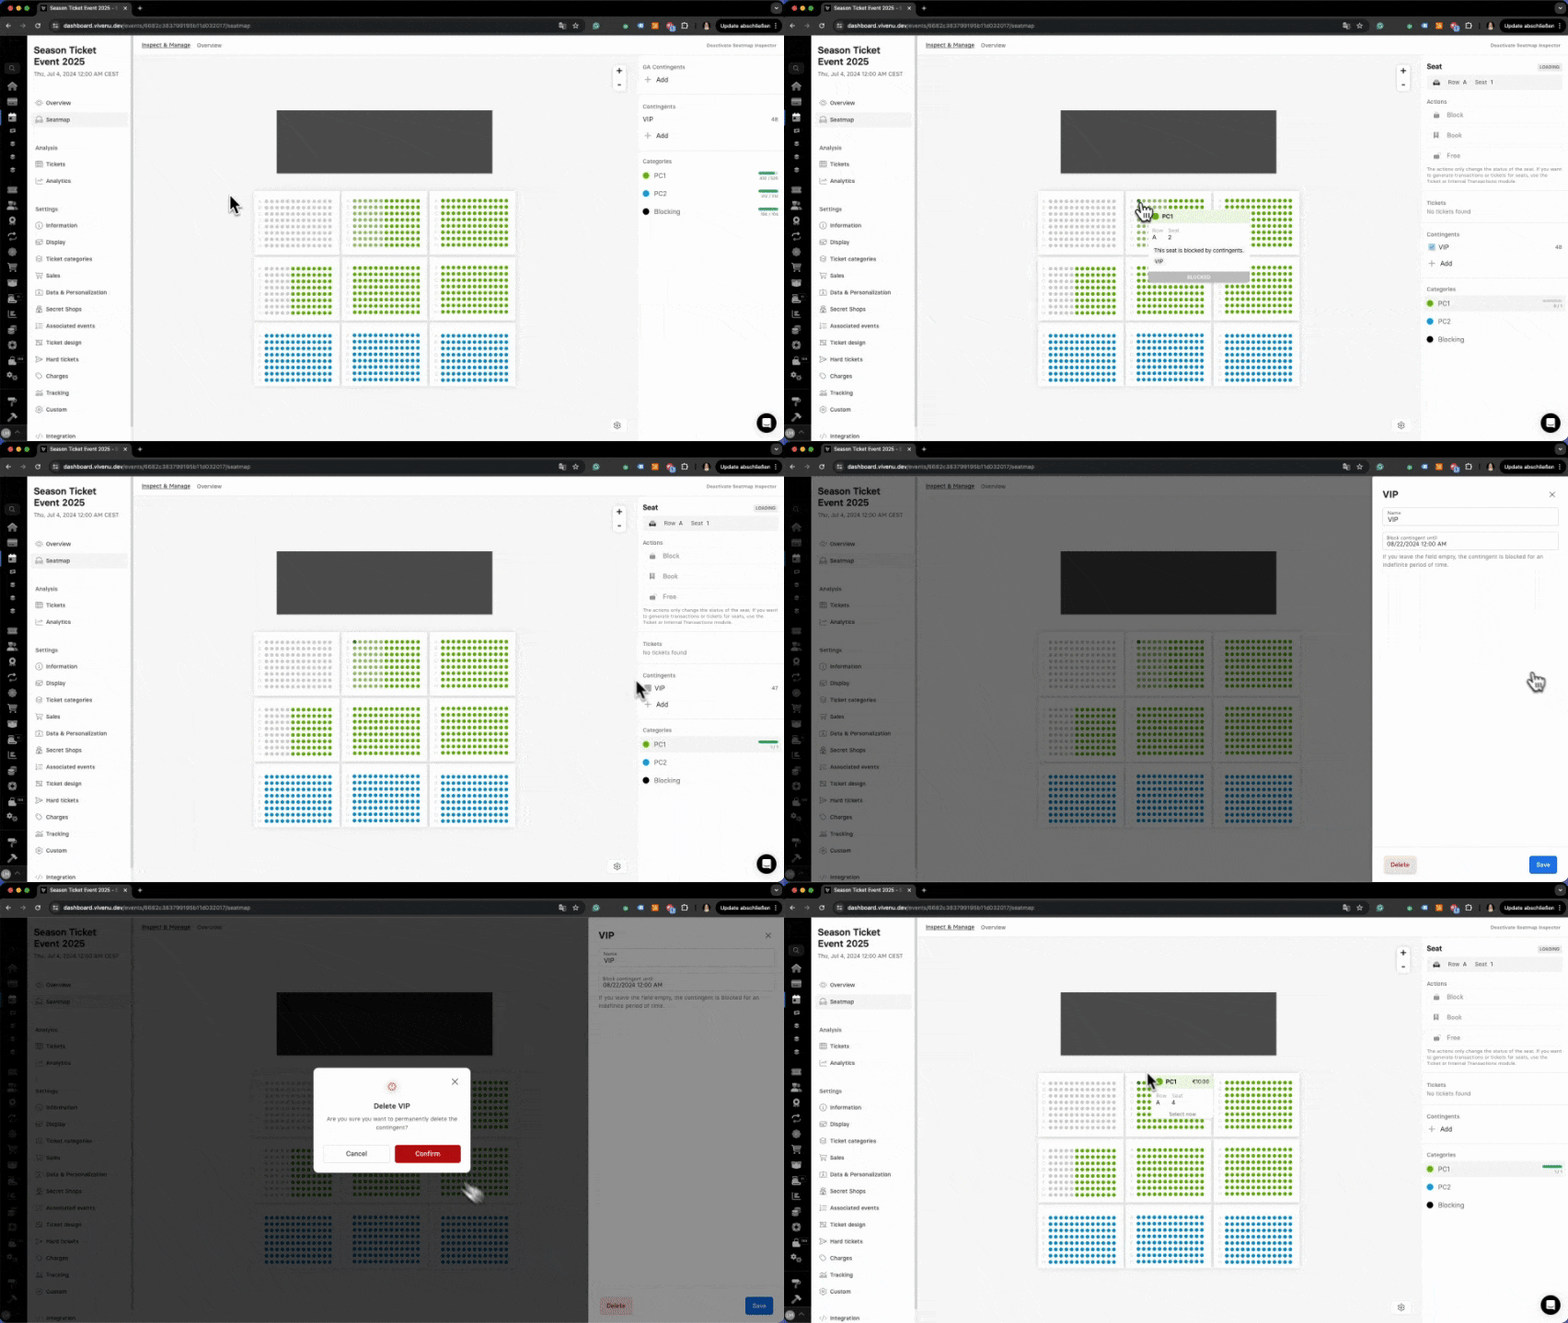
If needed, seat contingents can be removed from seats or completely deleted:
Open the Event Settings via the Events module for the event where seats are to be managed.
Navigate to the Seatmap tab within the Event Settings.
Click on the desired seat from which the allotment should be removed.
On the right, select the allotment again to remove the selection.
Click on the hammer icon next to the allotment to delete it completely.
Seatmap InspectorAdjusting Seat Categories for Specific Events
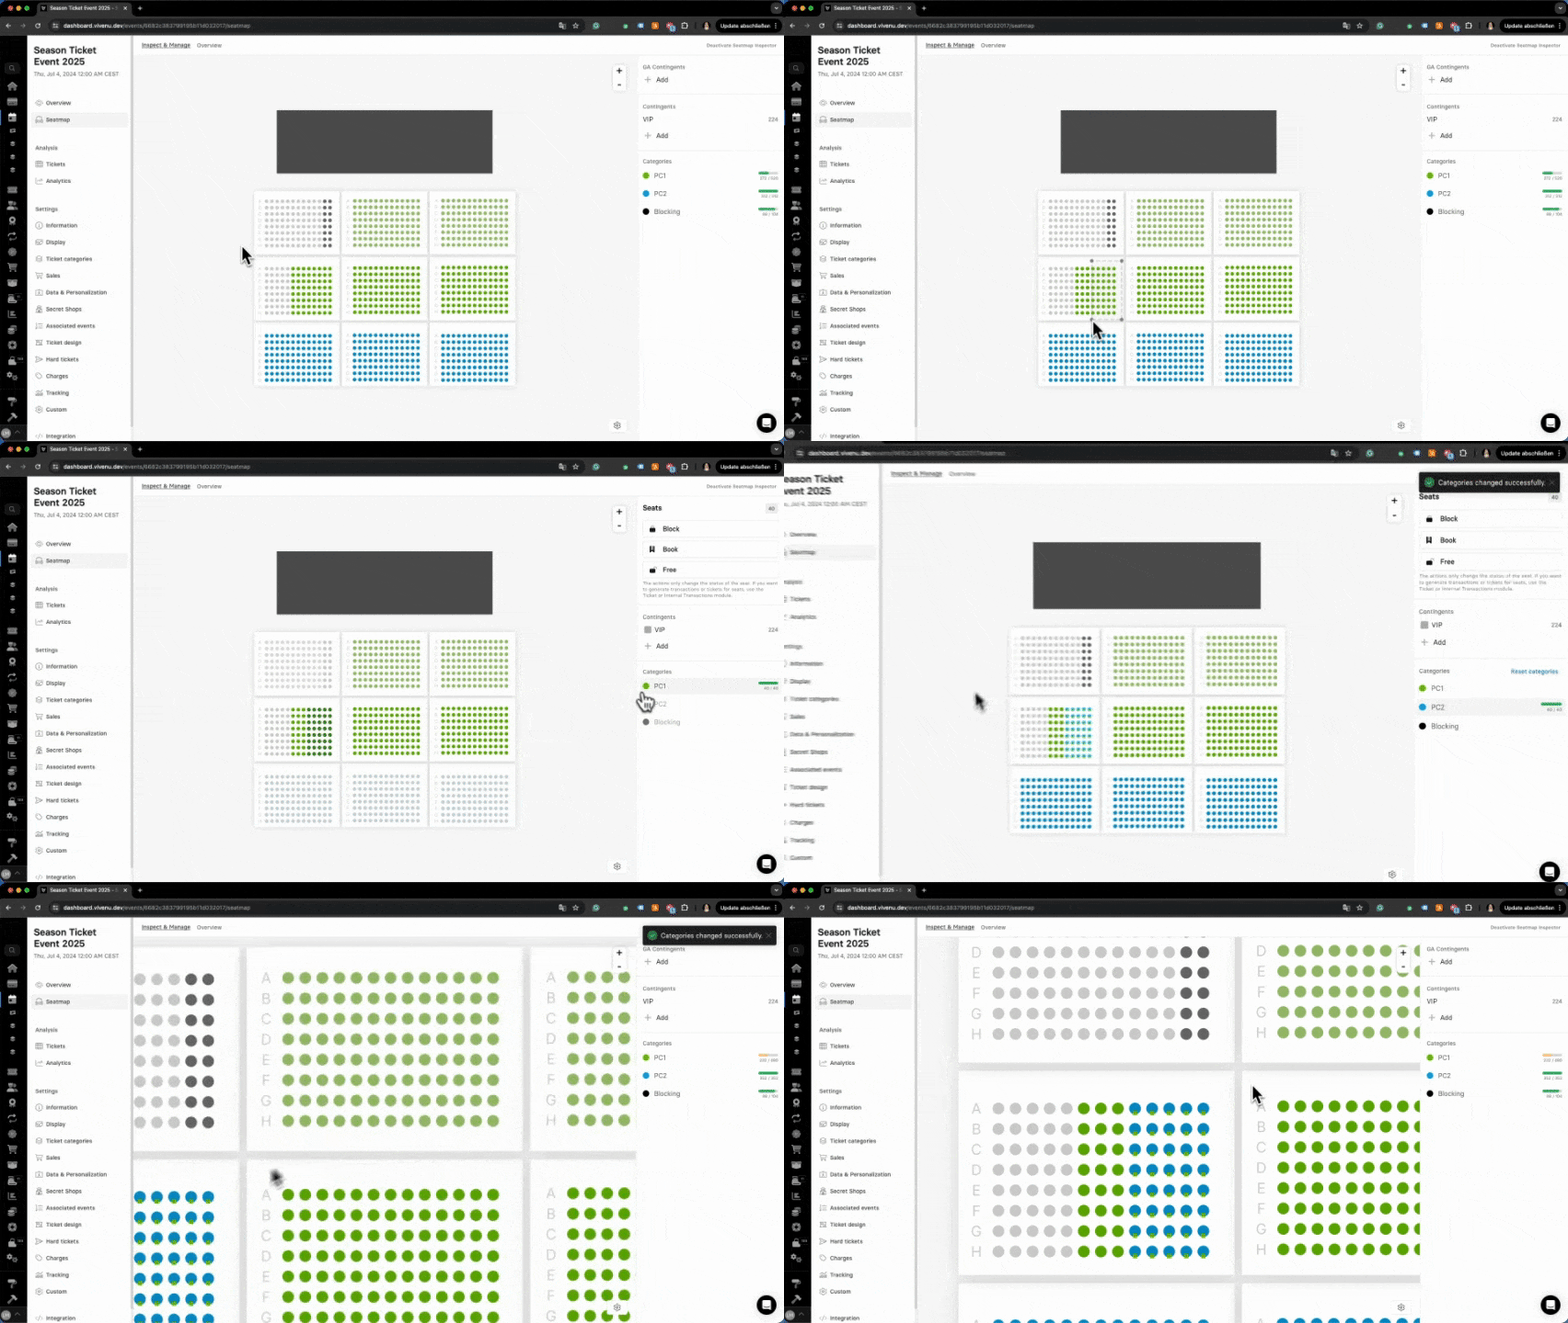
When there are sudden price changes for an event, it's possible to adjust seat categories for only that specific event without affecting the general seatmap settings. This ensures that other events remain unaffected by the adjustment.
Open the Event Settings via the Events module for the event where seats are to be managed.
Go to the Seatmap tab within the Event Settings.
Click on the desired seat. Hold down the Shift key to select multiple seats simultaneously. Use the Ctrl or Control key to draw a polygon for selection.
On the right menu, choose the desired seat category. The seats now belong to the selected category for this event. The previous settings remain unchanged for all other events.
Was this page helpful?
For the sake of better readability, the simultaneous use of the language forms male, female and diverse (m/f/d) is waived. All personal designations apply equally to all genders.