Setting Up & Managing
1 Printer Configuration
POS App Configurations

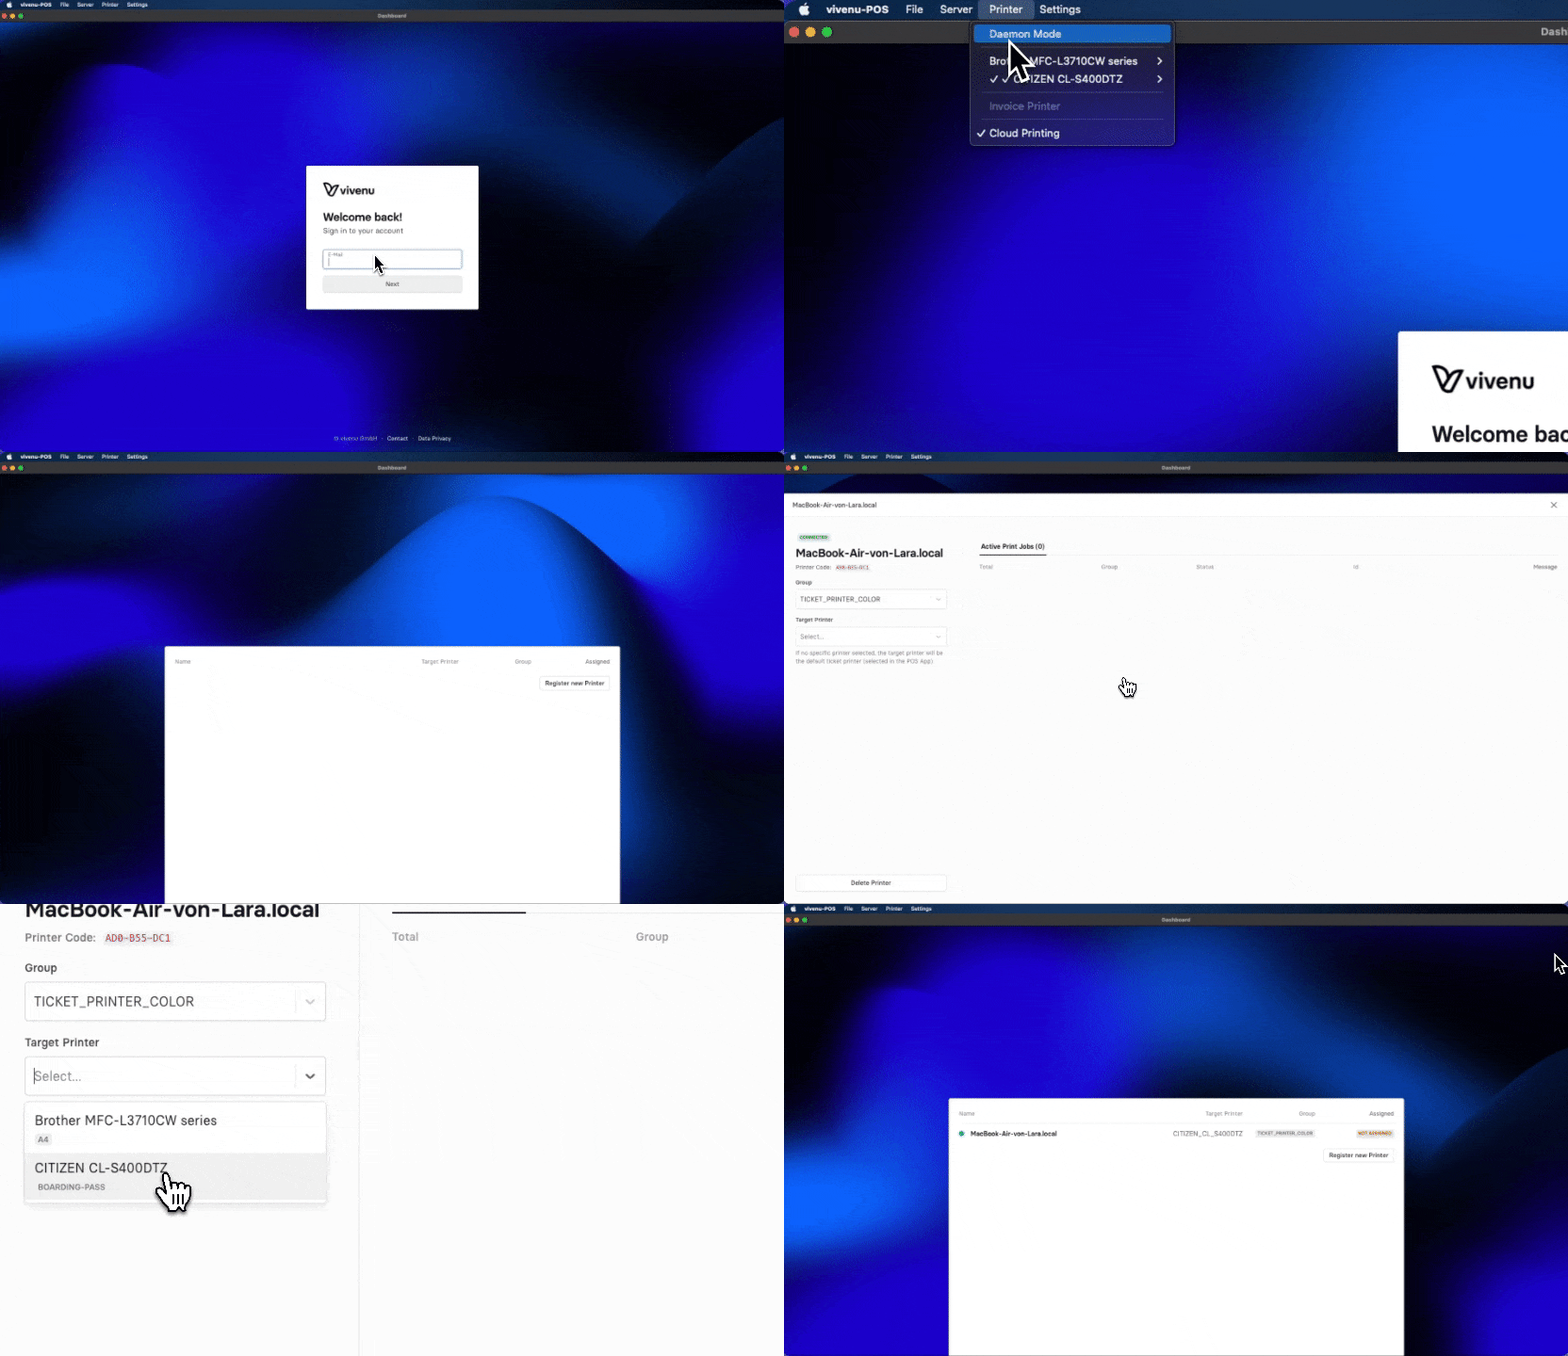
Open the POS App and click on Printer in the top bar, then select "Daemon Mode." A view with your active printers will appear.
Click on the first entry, opening a new window.
Under "Target Printer," choose the printer you want to connect to the virtual printer.
Click the X to close the window.
Click Register new Printer if you have additional printers to use and repeat the process.
Note: All printers connected to your computer will appear under Target Printer. If your printer is not listed, ensure it's correctly connected and installed.
Example: A BOCA printer for all ticket designs & a Laserjet printer for delivery notes and invoices.
Open the POS App, click on Printer in the top bar, and select "Daemon Mode." A view with your active printers will appear.
Click on the first entry, opening a new window.
Under Target Printer choose the BOCA printer.
Click the X to close the window.
Click Register new Printer and select the newly created printer.
Under Target Printer, choose the Laserjet printer.
Click the X to close the window.
Dashboard Configurations

This step aims to link the previously configured printers to your profile as an organizer. Although you've successfully connected the printers to our system, they haven't been personally assigned to you.
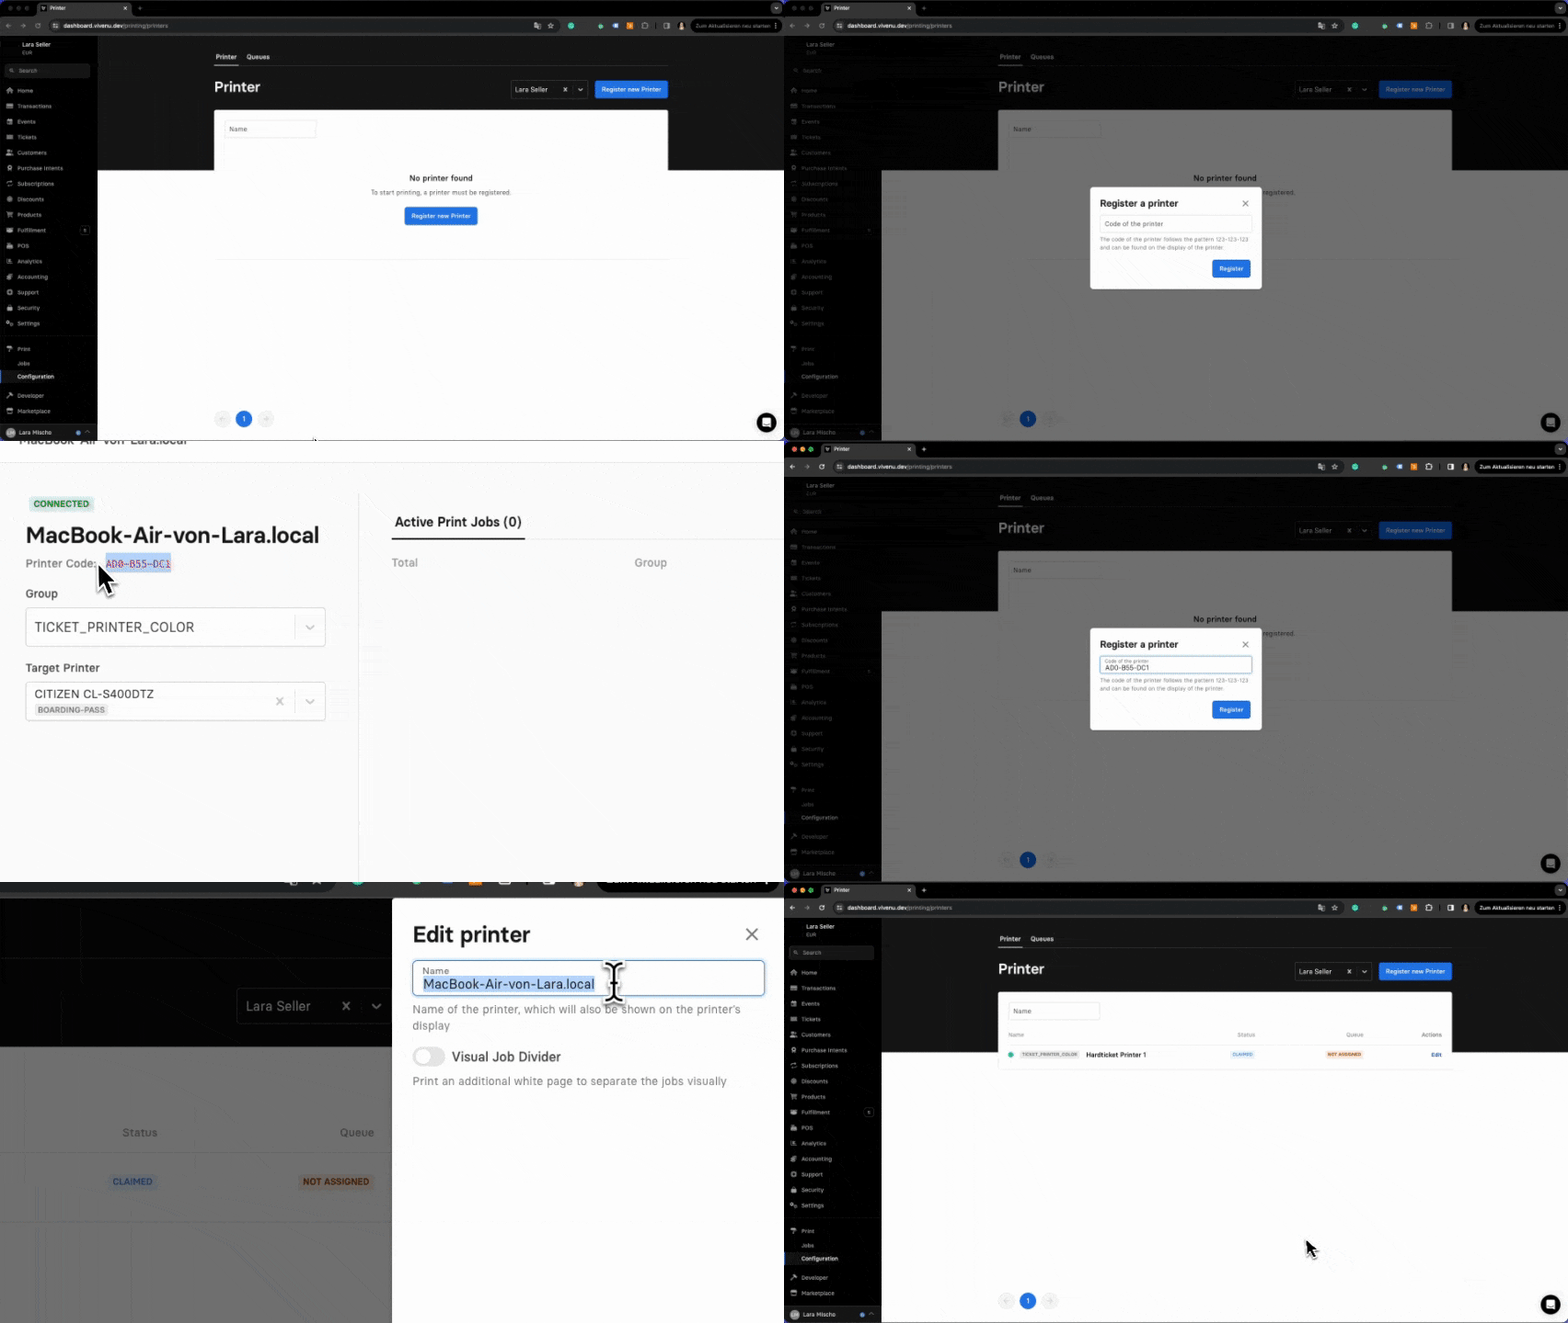
Open the vivenu Dashboard in your browser, keeping the POS App in Daemon Mode open.
Navigate to the Print tab and stay on the printer view.
Select Register Printer in the top right. It will prompt you for a printer code.
To obtain the printer code, go to the POS App in Daemon Mode, select the printer you want to register, and copy the printer code in the format XXX-XXX-XXX from the settings window.
Paste the printer code into the Dashboard and click Add.
Next to the printer in the Dashboard, click Edit to customize the printer's name. We recommend using a name that you can easily associate with (e.g., "Hardtickets1").
Repeat the process for all printers.
2 Queue Creation
What is a Queue?
Each print job you initiate is processed through a queue. This ensures that you can send print jobs simultaneously to different printers, allowing them to be processed and printed at the same time. This guarantees simultaneous printing of tickets, delivery notes, or invoices.
Dashboard Setup:
Open the vivenu Dashboard in your browser, keeping the POS App in Daemon Mode open.
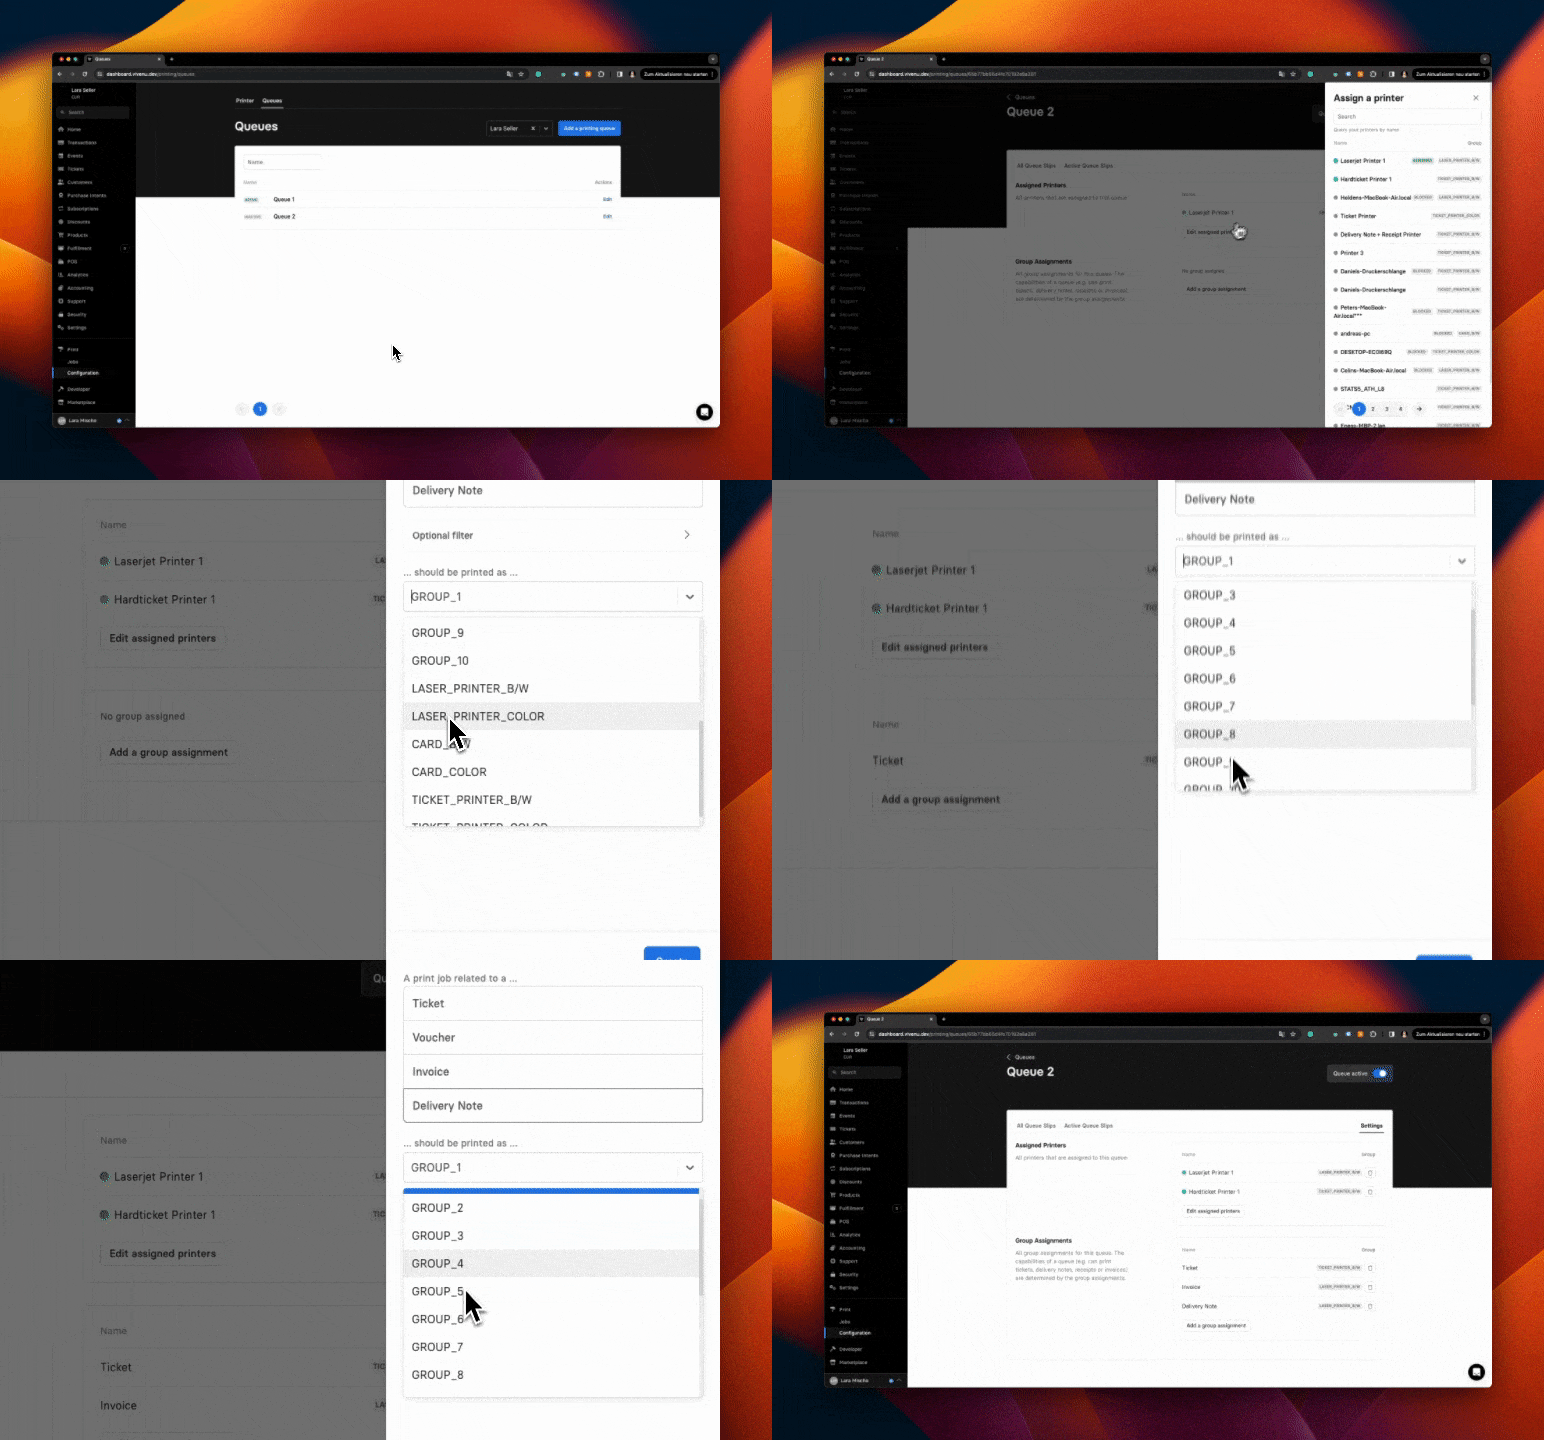
Navigate to the Print tab and select Queues.
Click Add Queue to set up a new queue. Assign a name you can easily recognize and click Add.
Select the queue and click Settings to configure the queue.
3 Queue Configuration

Printer Assignment
In printer assignment, you determine which printers should receive your print jobs from the queue. Assuming you use a specific ticket printer for tickets and a Laserjet printer for delivery notes, both printers must be assigned accordingly.
Follow the steps mentioned above.
Click Assign Printer to connect the already configured printers to the queue. Simply click on the printer to be linked with the queue.
Group Assignment without Templates:
The printers are now assigned to the queue, but it's necessary to specify which format or templates should be sent to each printer. This ensures that delivery notes go to the Laserjet printer and tickets go to the ticket printer.
In an assignment without templates, the same printer is always used, regardless of the printed ticket design. However, if a different printer needs to be addressed based on the ticket design, a group assignment with templates is required.
Note: We always recommend performing the assignment without templates as long as it is not unavoidable. Assigning via templates can unnecessarily complicate the setup.
Follow the steps mentioned above.
Click Add Assignment.
Choose Ticket to assign printers for tickets.
Skip the template setting.
Then choose the group that will be connected to your prints: Select "Ticket_Printer" for the standard ticket printer, "Card" for plastic cards, and "Laser_Printer" for Laserjet printers. Click "Create."
Repeat the process for Voucher, Invoice, and Delivery Note if you also want to print these.
Group Assignment with Templates:
Follow the steps mentioned above.
Click Add Assignment.
Choose Ticket to assign printers for tickets.
Under Template, select the template you want to associate with a group.
Then choose the group that will be connected to your prints: Select "Ticket_Printer" for the standard ticket printer, "Card" for plastic cards, and "Laser_Printer" for Laserjet printers. Click "Create."
Repeat the process for Voucher, Invoice, and Delivery Note if you also want to print these.
Printer Group Assignment:
After defining which data should be printed on which group, you need to assign these groups to the printers that will print the data for that group.
Go to the POS App in Daemon Mode.
Click on a printer, and a window will open.
Under Group on the left, select the group you set up in the queue. The printer will then print the data sent to this group.
Was this page helpful?
For the sake of better readability, the simultaneous use of the language forms male, female and diverse (m/f/d) is waived. All personal designations apply equally to all genders.