Recurring Events
Recurring EventsGeneral
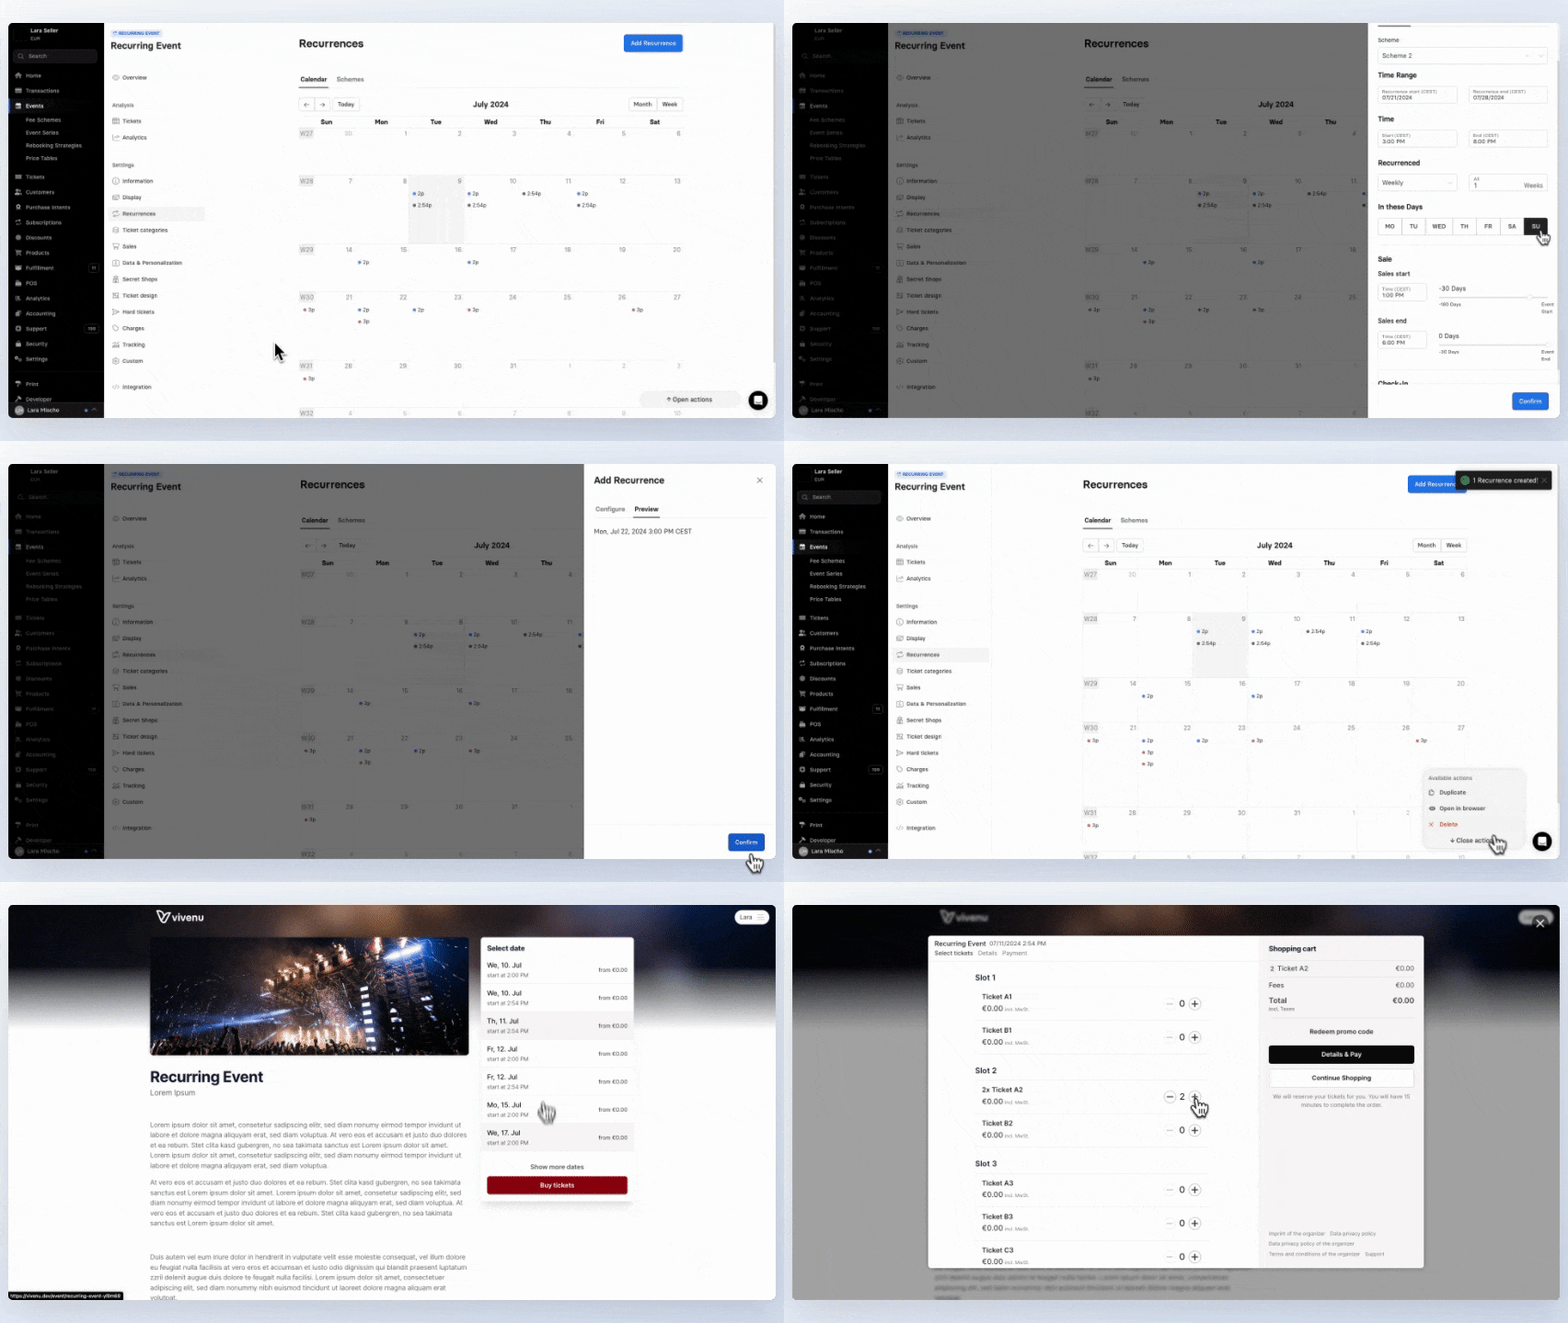
A recurring event is designed for regular events that repeat within a fixed framework, such as daily tours, concert series, or day tickets. This structure supports the creation of a single event per day, time slot, or event unit, allowing for efficient management of contingents, data, check-ins, and statistics.
Functionality:
In a recurring event, all settings such as tickets, prices, presentations, and automations are centrally stored in a so-called event parent. The event parent itself does not represent a standalone event with its own checkout page but serves as a container for the shared settings of all subordinate events.
Pro Tip: If individual adjustments are required for each event, we recommend not using recurring events. Instead, you can create individual events and duplicate them as needed.
Benefits
Central Management: Changes can be made simultaneously for all subordinate events.
Efficient Creation: Hundreds of events can be created with just one click.
Individual Customization: Different settings are possible by decoupling an event from the recurrence.
Ticket Schemas: Different ticket types and time slots can be represented through schemas.
Important Notes
Decoupling Events: Individual settings require decoupling events from the recurrence to ensure that changes in the event parent only apply to specific events.
Once Decoupled: A decoupled event cannot be reinserted into a recurrence and becomes an independent standard event.
Deleting Events: Individual events can be deleted from a recurrence, but not multiple events simultaneously.
Event Name: The event name is the same across all events in a recurrence.
Sales Period: The sales start and end times depend on the start and end dates of the respective events. A fixed date for all events in a recurrence is not possible.
Changing Dates and Times: Changing the date and sales period only affects individual events within a recurrence, not all events simultaneously.
Recurring EventsSetup Recurring Events
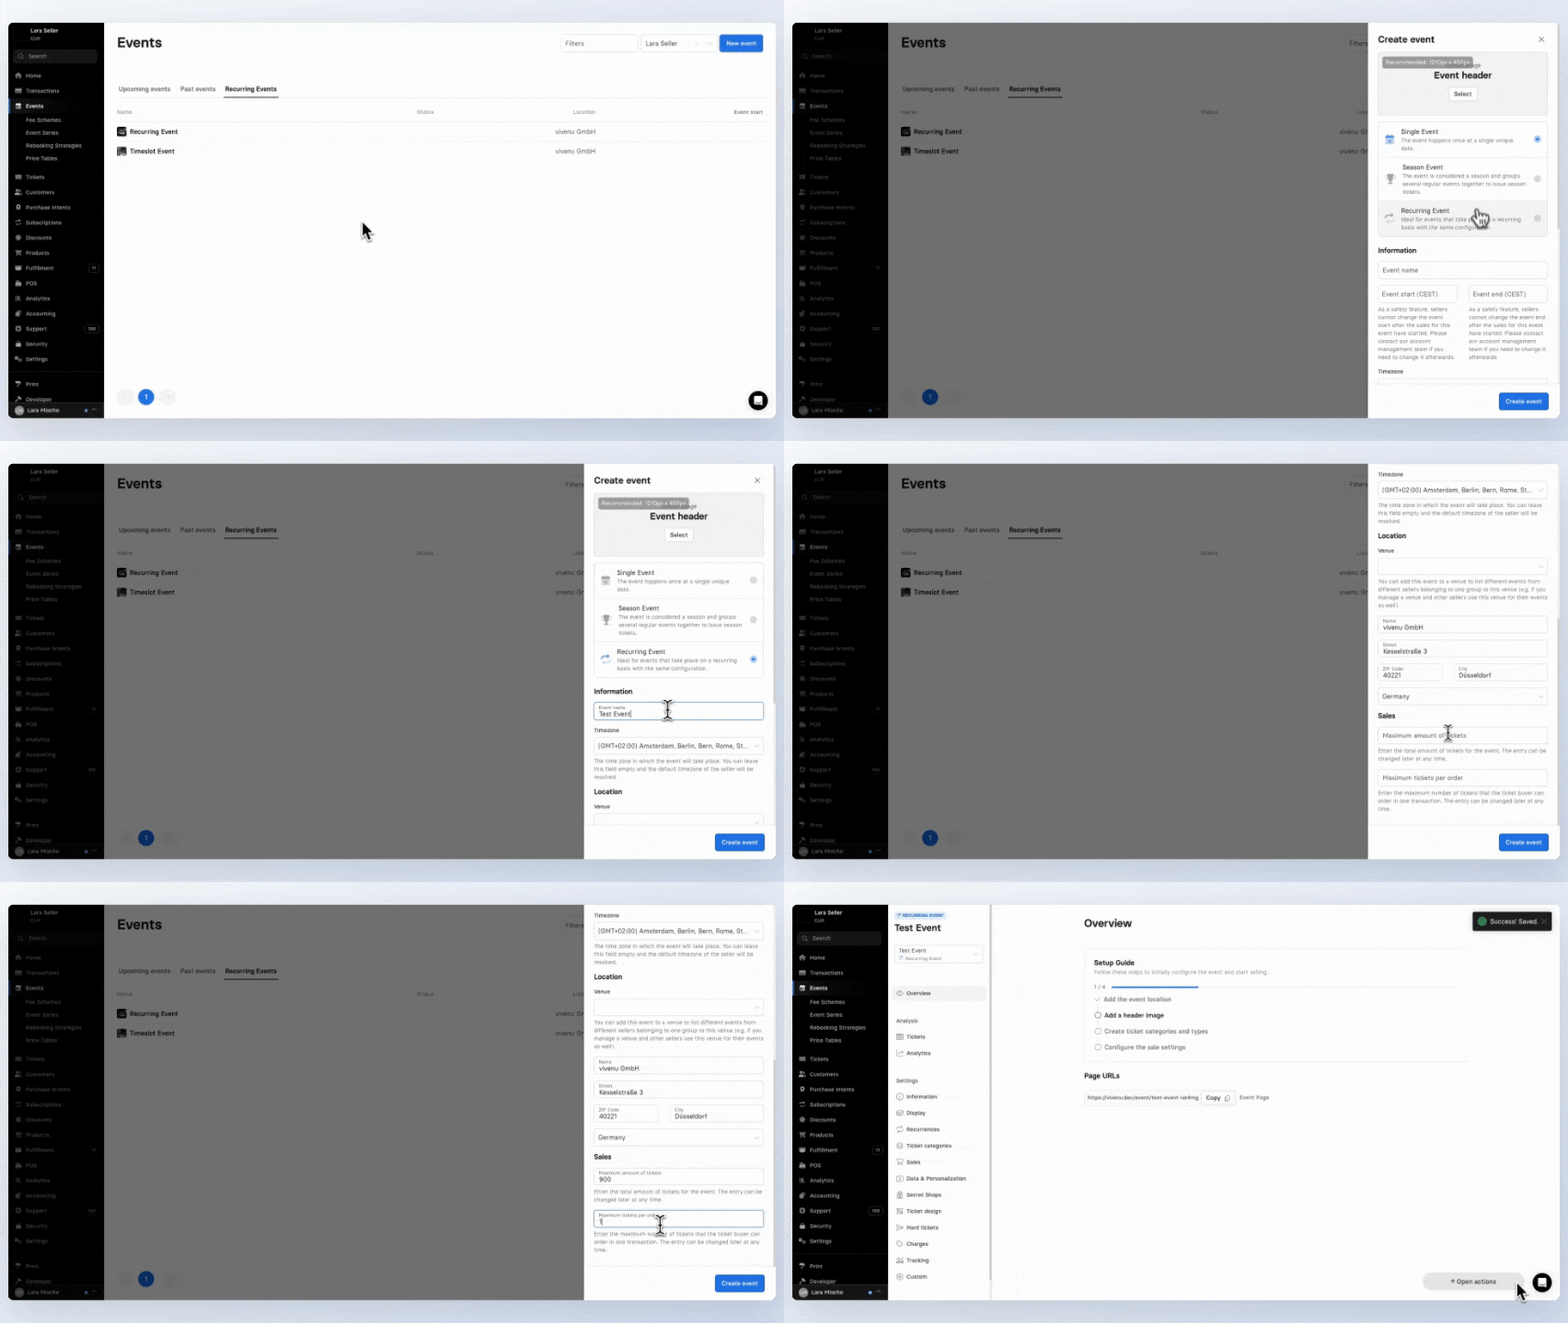
A recurring event can be created either entirely new or by duplicating an existing event. During the creation process, an event parent is first created, which only stores the settings. This does not serve as a standalone event with a checkout and event page, but rather forms the basis for the subordinate events created within this framework. For this reason, the event date is not set during the creation process.
Create a New Recurring Event
Go to the Events module.
Click on New Event in the top right corner. A new window will open.
Select the event type Recurring Event.
Fill in the necessary fields and click Create Event.
Create a Recurring Event by Duplicating
A recurring event can be created by duplicating a simple event or another recurring event. This allows you to use the settings of another event without needing to re-enter them. However, creating a recurring event from a season ticket event is not possible.
Go to the Events module.
Open the desired event that you want to duplicate for your recurring event. It doesn't matter if it's a simple event or a recurring event.
Click on Open Actions in the bottom right corner and select Duplicate.
Select the event type Recurring Event.
Fill in the necessary fields and click Create Event.
Recurring EventsSetup Recurrences
Most settings for a recurring event are stored in the parent event. The event parent serves solely for managing settings and is not an independent event with its own checkout page or event page. Under the event parent, repeated events are created that inherit all settings from the event parent and automatically synchronize when changes are made to the parent.
An event within a recurrence can only deviate from the parent in the following settings:
Event date
Sales start and end
Check-in date
Active ticket types via schemes
Schemes
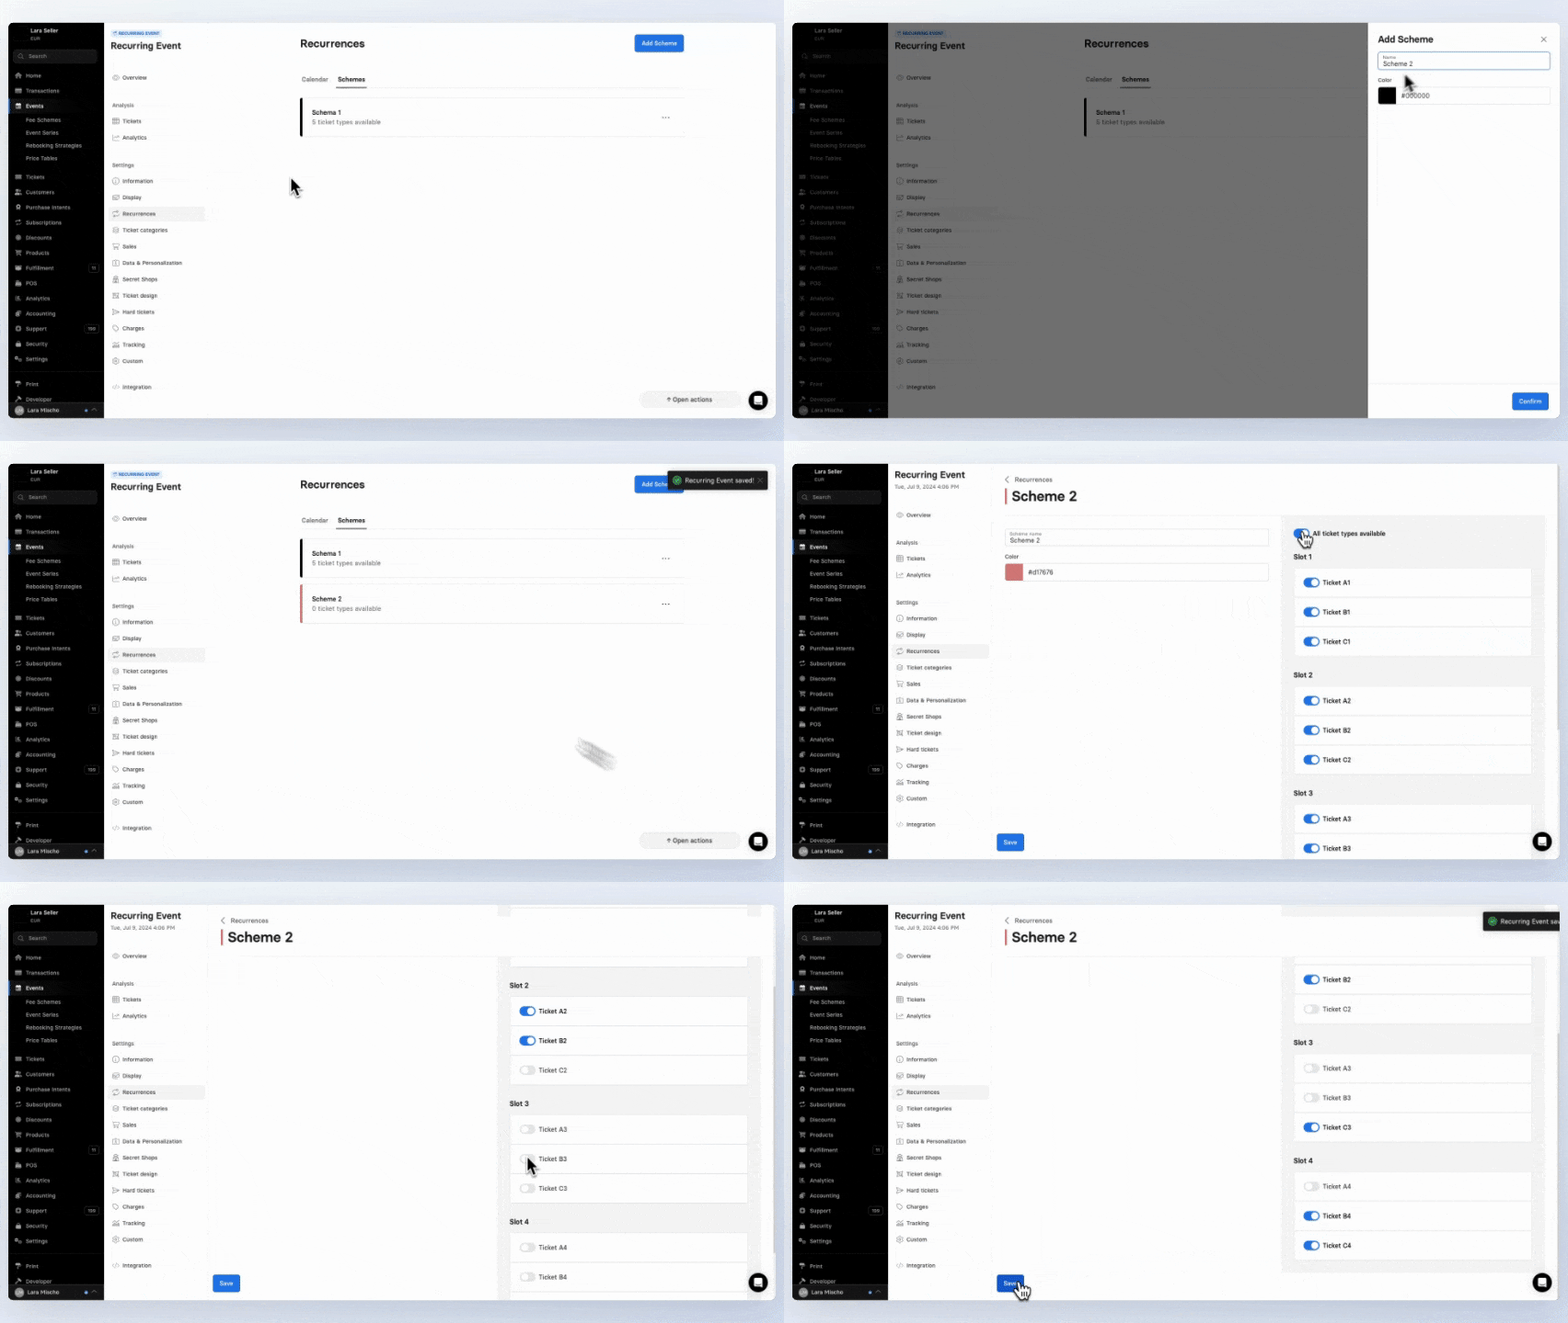
Schemes for recurring events allow for the customization of active ticket types for individual events within an event parent. This ensures efficient management of events with different active ticket types, such as weekends, holidays, or other special days, under the same event parent without needing to create a new separate recurring event.
Schemes are visually represented in different colors on the calendar view of the recurrences, making it easy to see at a glance which ticket type settings apply to which event.
Examples of Use:
Each ticket category represents a different time slot. Separate time slots can be activated for weekends, while different ones apply during weekdays.
Additional ticket types are available on holidays. A specific scheme can be created to activate these ticket types only on those days.
Different prices apply on specific days. By using schemes, prices can be adjusted only for those days, while standard prices apply on other days.
Creating Schemes
Go to the Events module and open the desired recurring event.
Navigate to the Recurrences tab in the event settings of the recurring event. A calendar view will appear.
Click on the Schemes tab at the top.
Click Add Scheme to create a new scheme. A new window will appear.
Provide a desired name and choose a color. This information is for internal recognition purposes only when associating schemes with specific events.
Click Confirm.
Open the desired scheme.
Activate the desired ticket types on the right side that should be active for this scheme.
Click Save.
Create as many combinations of ticket type schemes as needed. If a scheme is only needed for exceptions, you can create events without a scheme initially and add the scheme later for events with deviations. Note that in this case, there won't be a color marking in the calendar overview of the event settings.
Schemes can also be adjusted retroactively for each event.
Changing a Scheme afterwards
Go to the Events module and open the desired recurring event.
Navigate to the Recurrences tab in the event settings of the recurring event. A calendar view will appear.
Click on the desired event by selecting the time slot in the calendar. A new window will appear.
Choose the desired scheme from the drop-down menu.
Add Recurrences
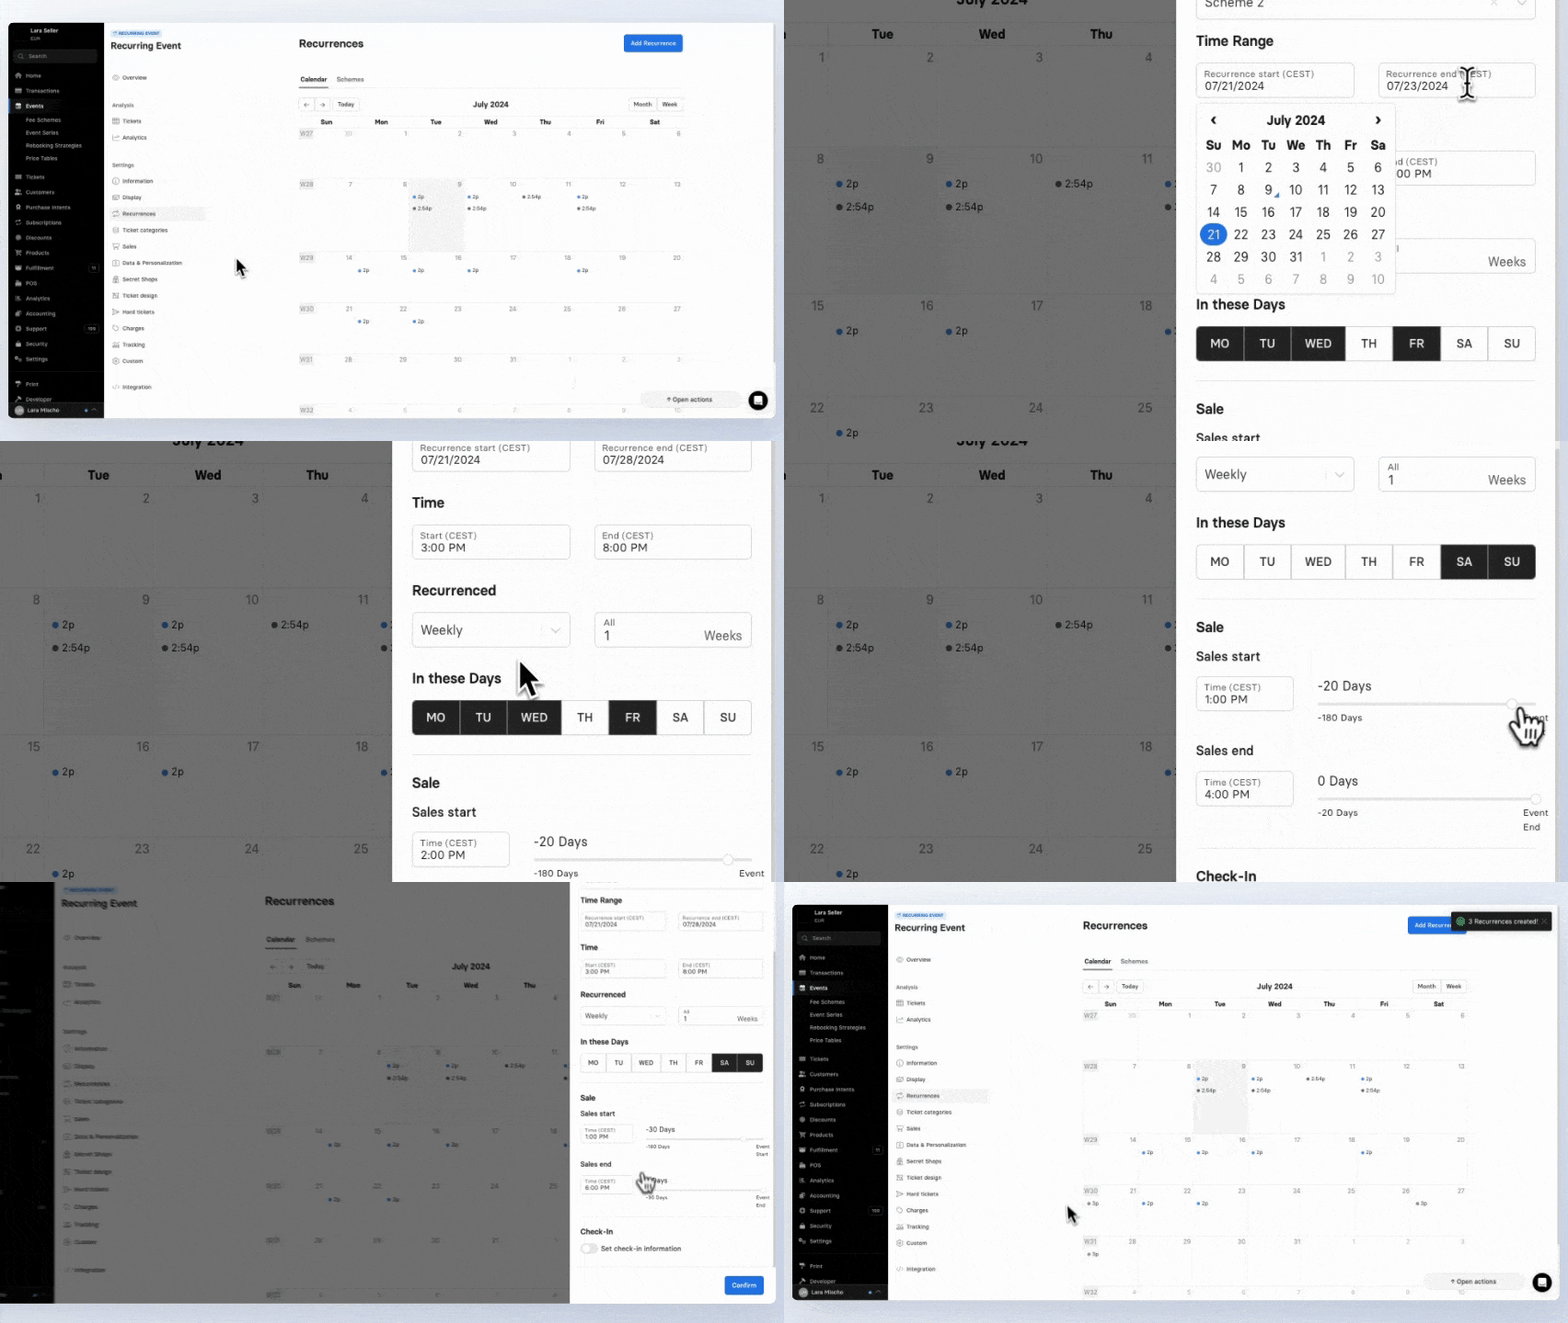
When adding recurrences, start by defining a period during which the events should occur. Next, specify how frequently the event should repeat within this period. This allows you to create multiple events at once.
Go to the Events module and open the desired recurring event.
Navigate to the Recurrences tab in the event settings of the recurring event. A calendar view will appear.
Click on Add Recurrence in the top right corner.
Scheme: Choose a scheme to activate the desired ticket types.
Period: Select the period during which the events should be created. For example, if you want to create events from January 1st to December 31st, specify this period.
Time: Select the start and end times for the event. This time will apply to each event created.
Repeat: Choose how frequently the event should repeat within the selected period. For example, daily or every Monday and Tuesday.
Sales: The sales period is always defined based on the event start and end times. This ensures flexibility in adjusting the sales date. Use the time to specify the fixed time for each sales period.
Check-in: Optionally, provide check-in information, which is also determined based on the event start time.
Click Preview at the top of the window to review which events will be created.
Click Confirm to add the recurrences.
Manage Event and Sales Dates
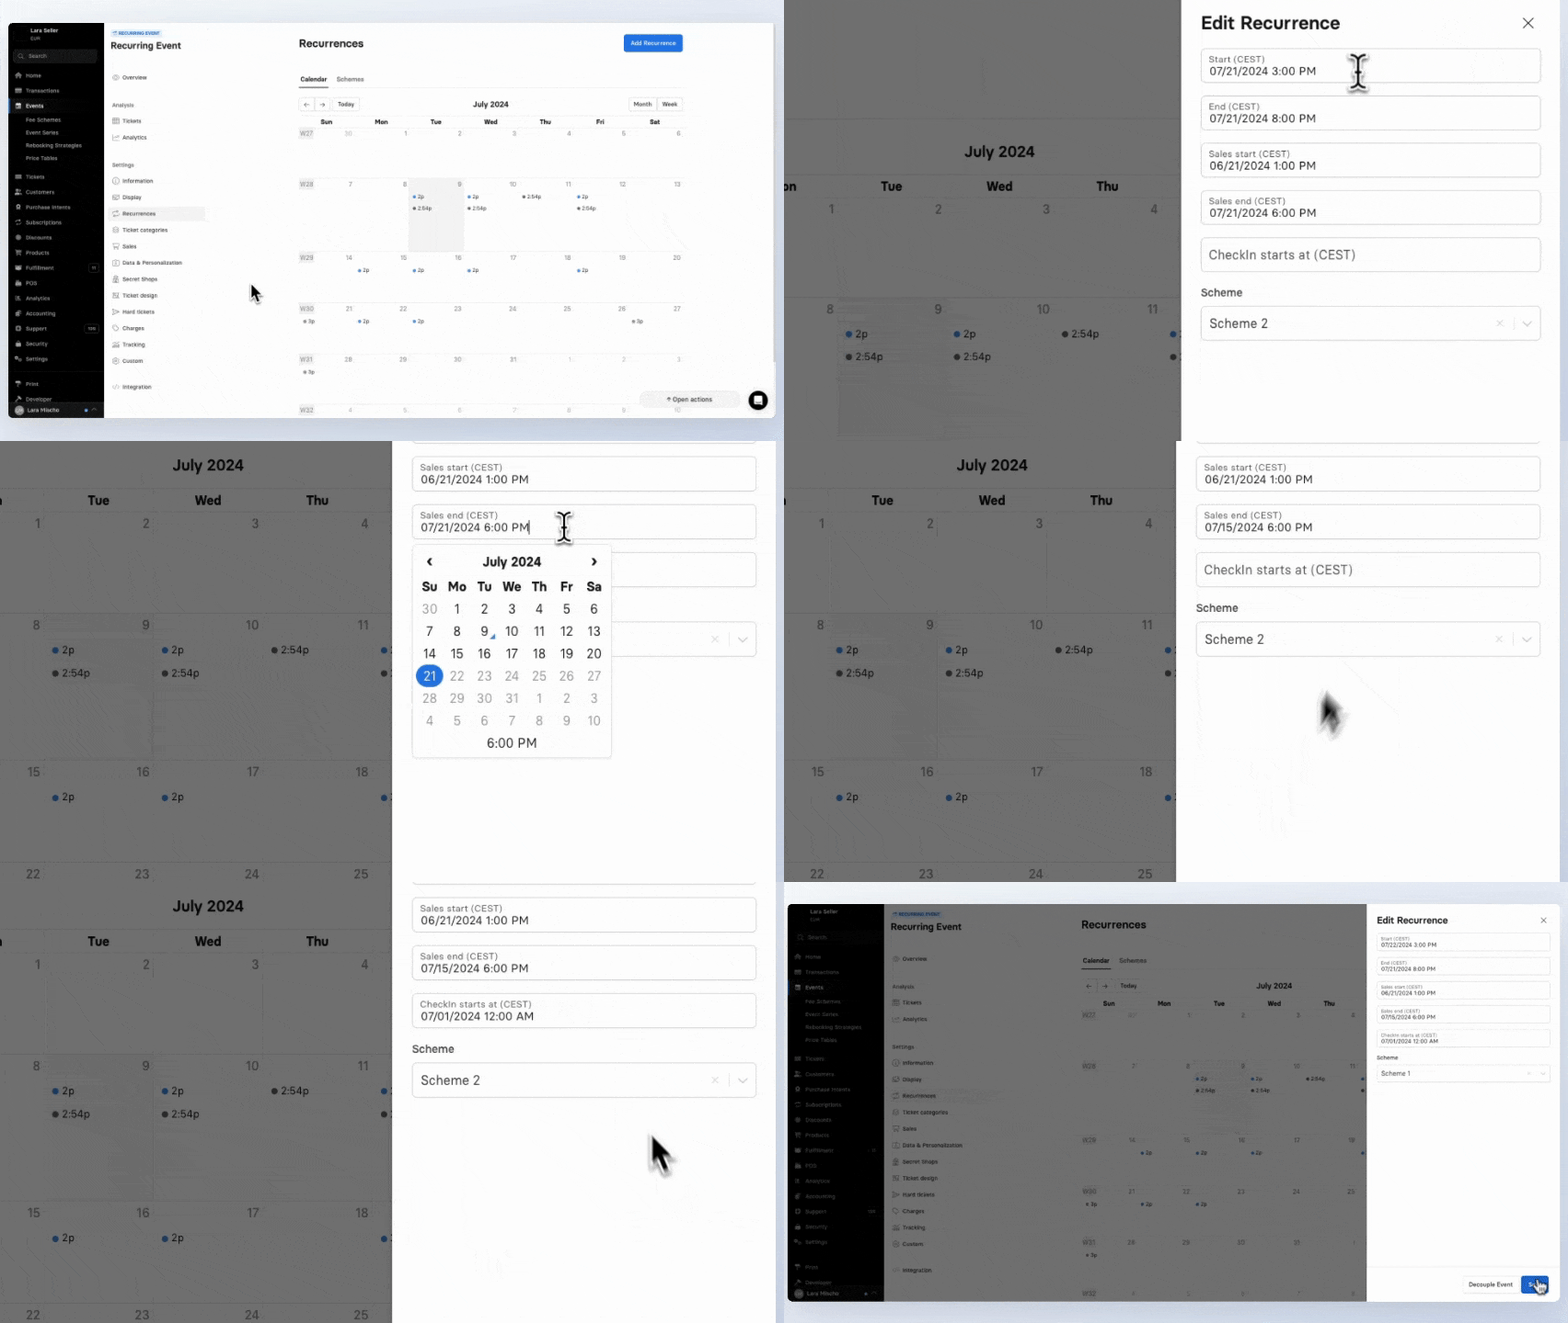
If the event date or sales date of an individual event within a recurrence needs to be changed, it can be flexibly adjusted per event.
Go to the Events module and open the desired recurring event.
Navigate to the Recurrences tab in the event settings of the recurring event. A calendar view will appear.
Select the desired event by clicking on the time in the calendar.
Modify the dates as desired and click Save.
Recurring EventsDelete and Decouple
An individual event can be deleted from a recurrence if needed. If only the settings of an individual event need to differ, it can also be decoupled from the recurrence.
Delete an Entire Recurring Event
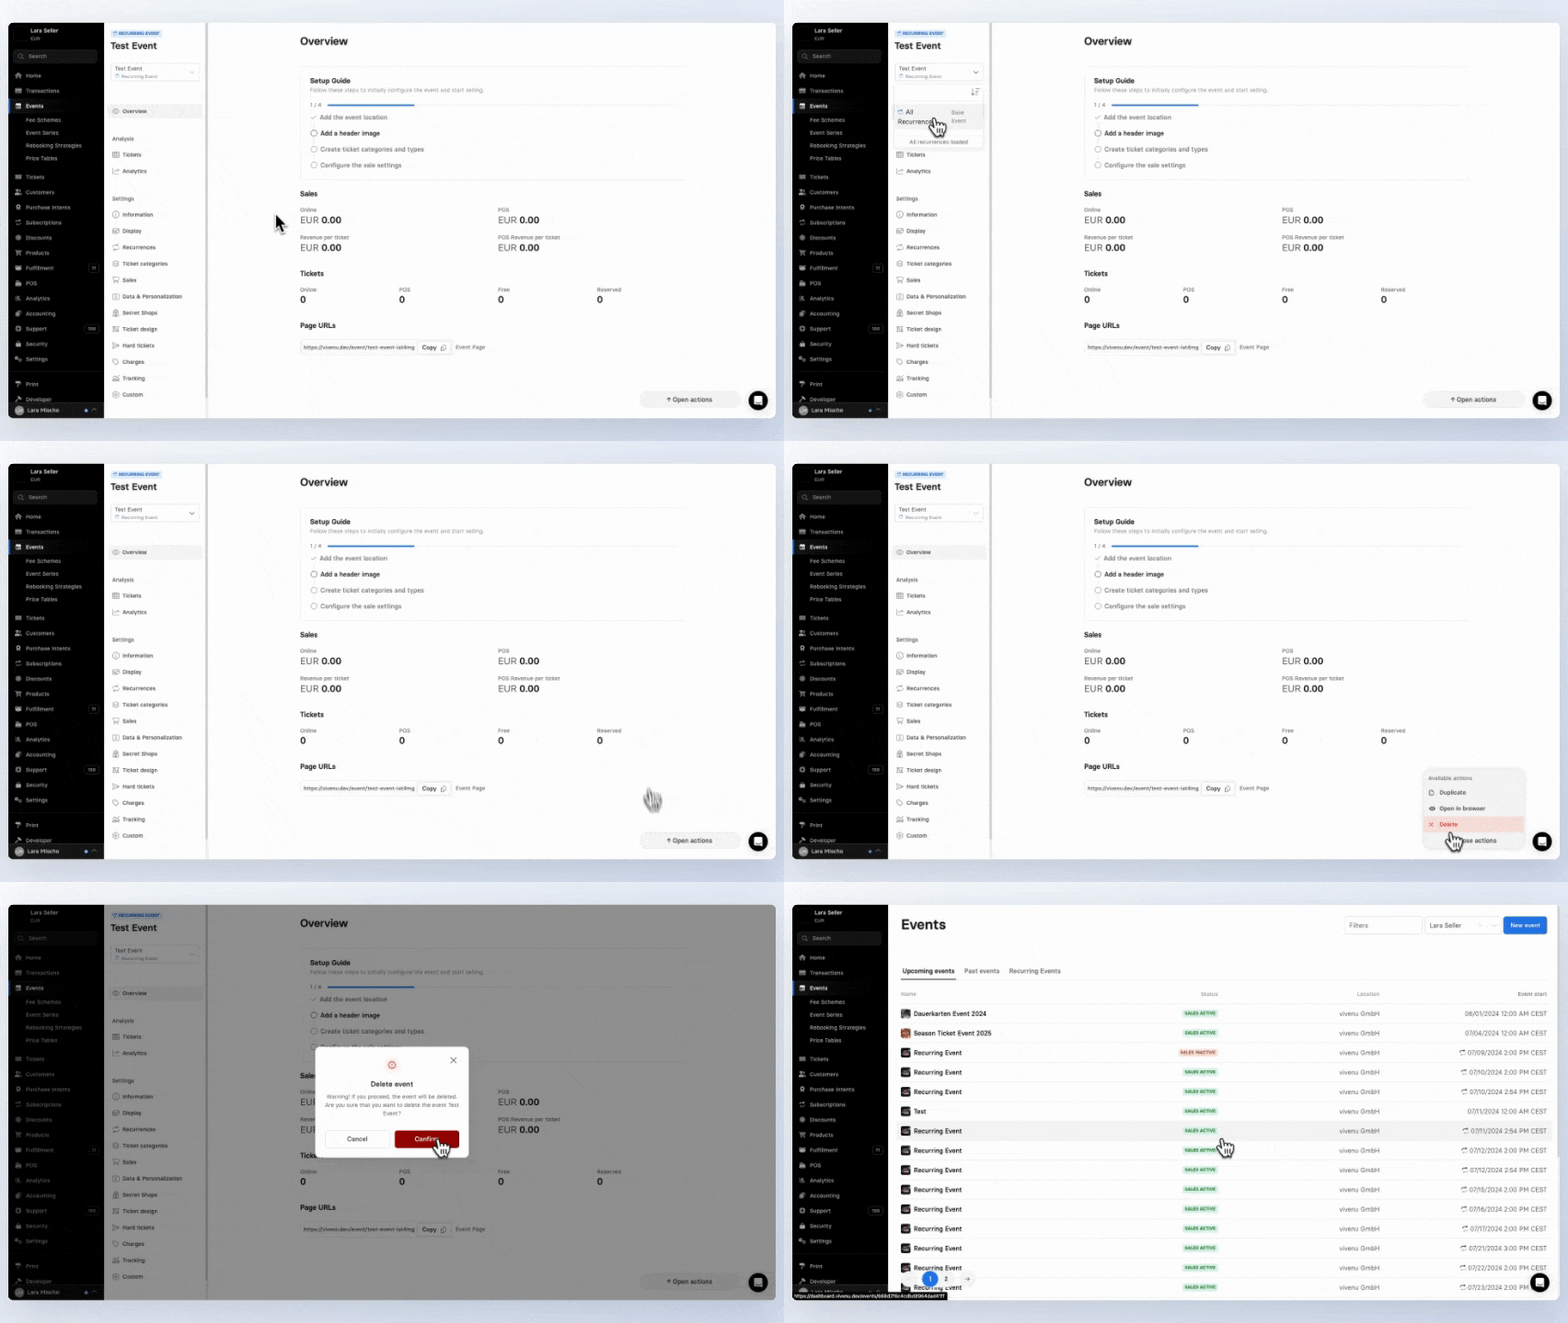
Go to the Events module and open the desired recurring event.
Stay on the Overview tab in the event settings.
From the dropdown menu above the Overview tab, select the entire recurrence. It will be highlighted with blue arrows.
Click Open Actions in the bottom right corner and choose Delete.
Note: An event can only be deleted if no tickets or transactions have been created for it so far. This includes transactions that have not been completed.
Delete Events within a Recurrence
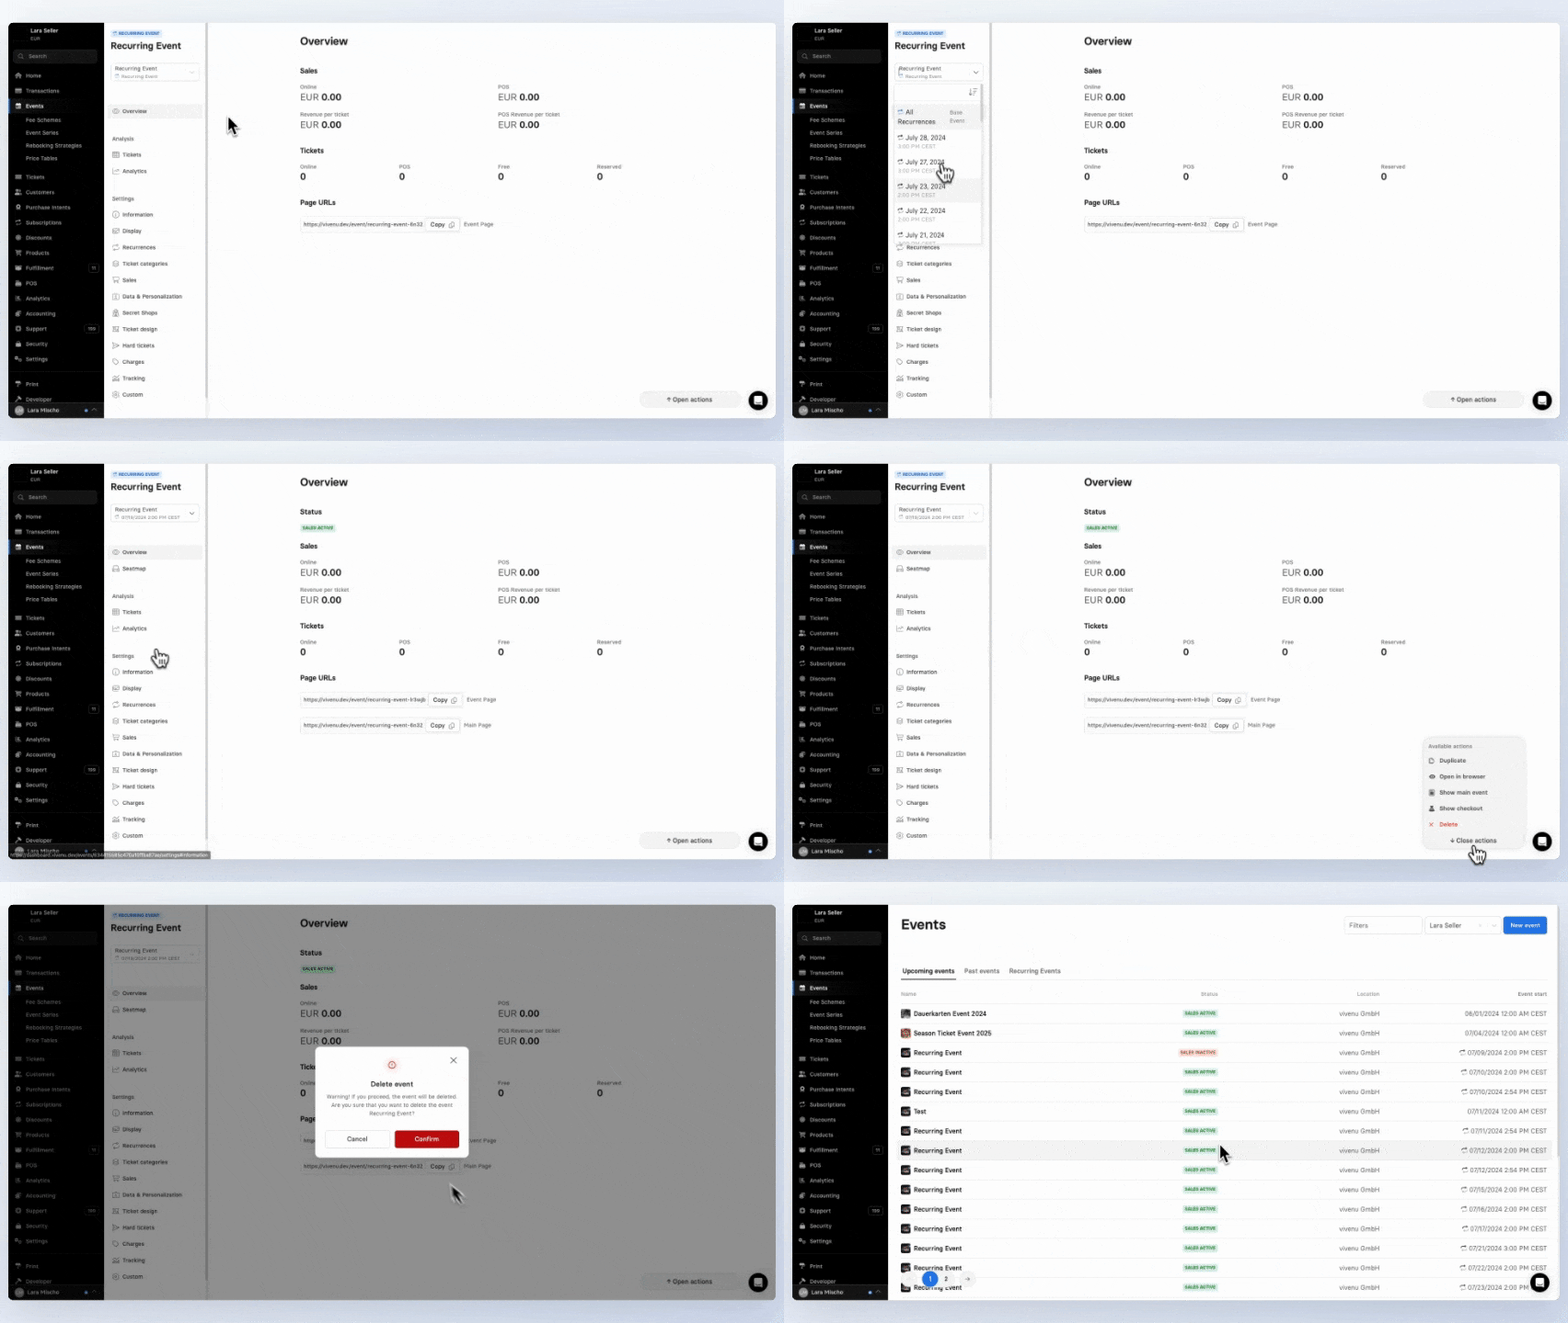
Go to the Events module and open the desired recurring event.
Stay on the Overview tab in the event settings.
From the dropdown menu above the Overview tab, select the desired event.
Click Open Actions in the bottom right corner and choose Delete.
Note: An event can only be deleted if no tickets or transactions have been created for it so far. This includes transactions that have not been completed.
Decouple Events from a Recurrence
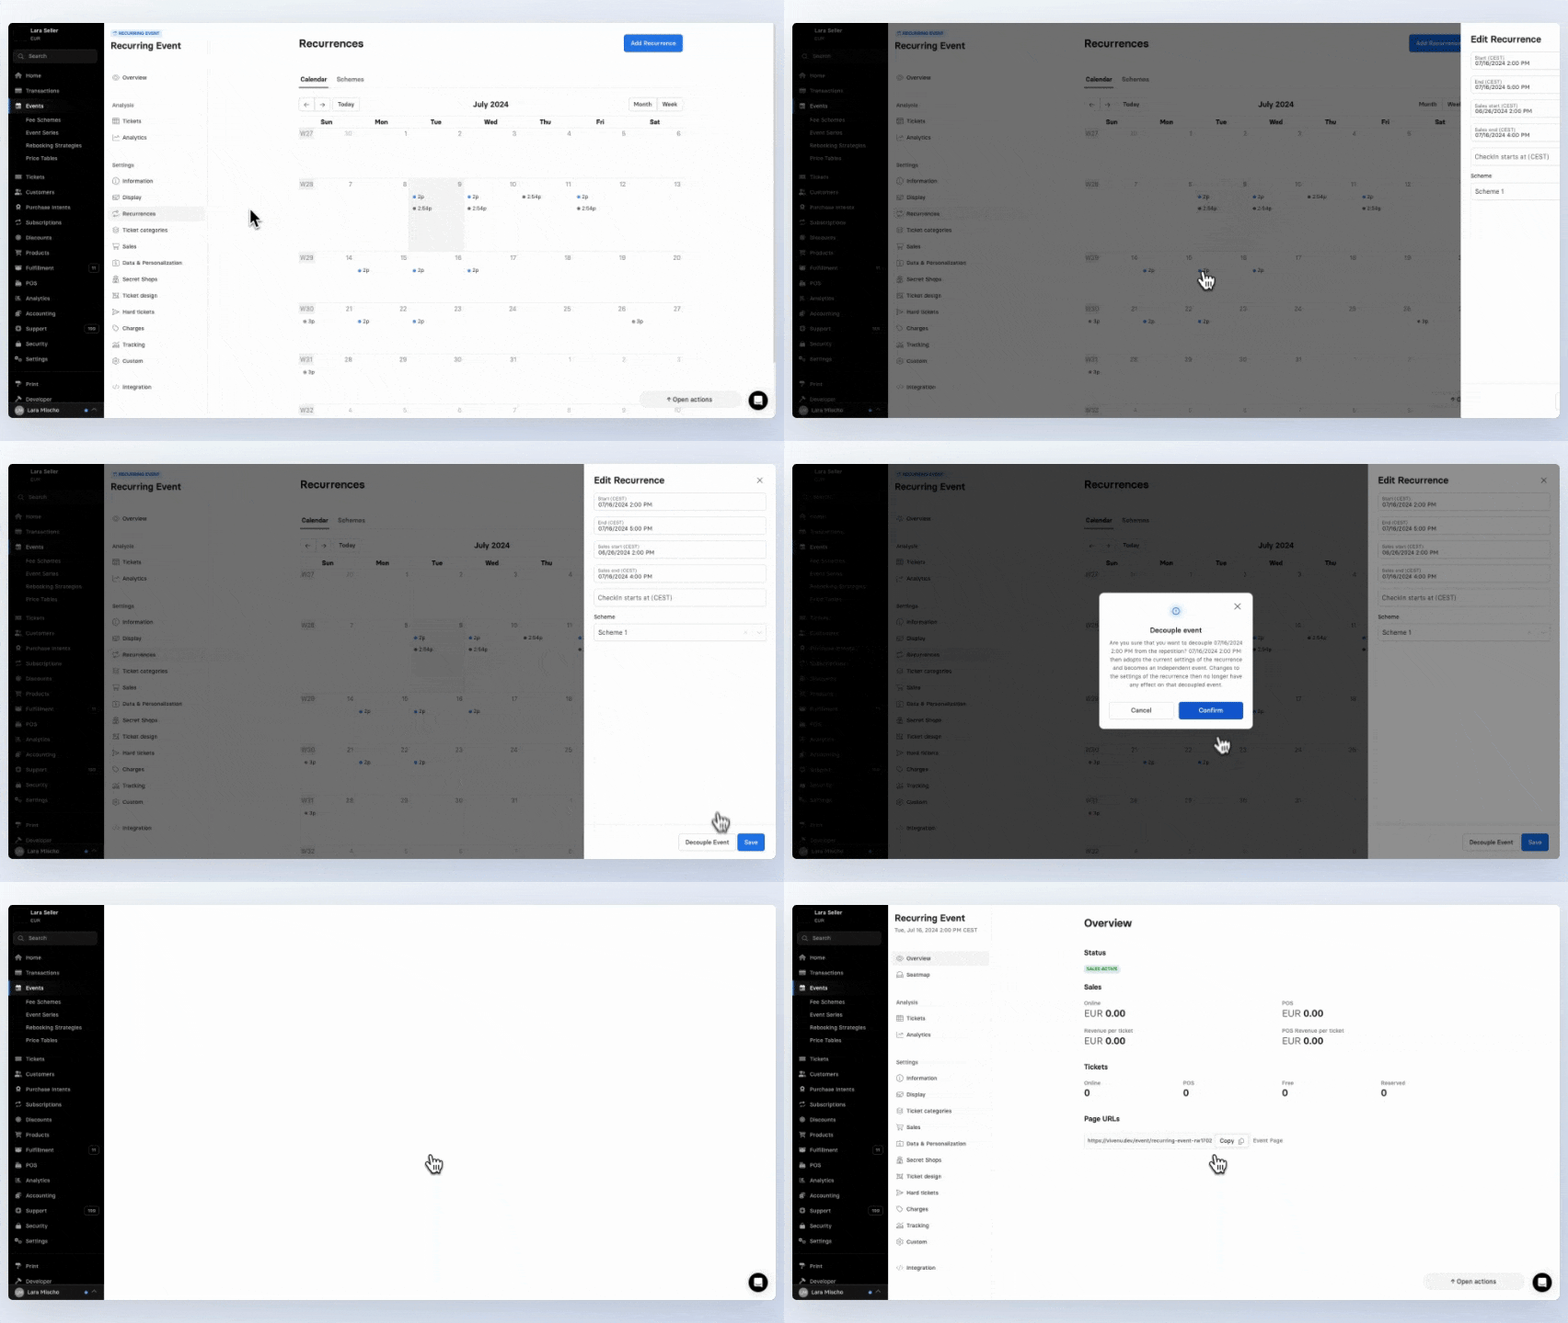
Decoupling removes an event from the recurrence, making it a standalone event. It no longer remains associated with the recurrence and cannot be added back later. This ensures that the settings of a parent event always remain consistent with the events associated with it and continue to synchronize with any changes made.
Decoupling can be used when an event should no longer synchronize with the settings of a parent event and alternative settings need to be applied.
Note: Once decoupled, the event will no longer appear on the event page of the recurring event and must be managed through the Hero Shop.
Go to the Events module and open the desired recurring event.
Navigate to the Recurrences tab in the event settings of the recurring event. A calendar view will appear.
Select the desired event by clicking on the time in the calendar.
Click on Decouple Event.
Was this page helpful?
For the sake of better readability, the simultaneous use of the language forms male, female and diverse (m/f/d) is waived. All personal designations apply equally to all genders.